
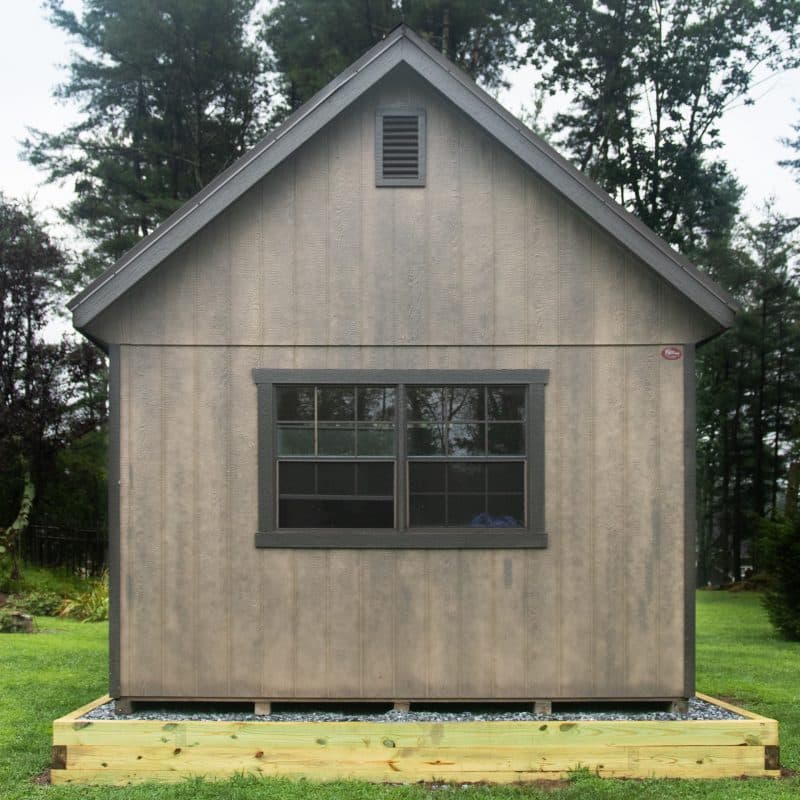
Gravel shed foundations are one of the most straightforward, economical, and durable types of shed foundations out there. In addition, they’re also one of the simplest to install on your own.
So, whether you’re a seasoned DIYer or just a homeowner looking to prep the site for your new shed, this guide should give you all the info you need to get the job done. Plus, we’ll throw in some tips and tricks we’ve learned during our years as professional shed foundation installers.
Table of Contents
Why Install A Gravel Shed Foundation?
If you’re reading this article, you’re most likely set on building/installing a gravel shed foundation. If not, here are a few more reasons why it should be your shed foundation of choice. (If you prefer, check out our video guide to installing your gravel shed foundation.)
1. Gravel is the best type of foundation for your shed
There’s nothing quite like a gravel foundation for protecting a shed.
First off, it drains much better than a flat concrete pad. That’ll help protect the runners and joists under your shed from rotting and decaying.
Second, it supports your shed much better shed foundation blocks. A gravel shed foundation distributes the weight of the shed evenly across all parts of the frame, instead of resting on only a few points with gaps in between. That’s especially important if you plan to store heavy equipment or a vehicle in your shed.
2. Gravel is one of the easiest shed foundations to install
Anyone with at least intermediate construction/tools skills can handle installing a gravel shed pad. Plus, there’s no need to get a concrete truck in your yard to pour this foundation! You can haul all your supplies in with a wheelbarrow and use hand tools to do the work. (We’ll be honest, though, power tools will really speed up the process and save some sweating!)

3. Gravel is one of the most economical types of shed foundation
For a durable foundation that will support your shed adequately, it’s hard to find a better priced option than a gravel pad. Both materials and labor will be less expensive than for a similar foundation built from concrete. If you’d like more info, check out our article on the pros and cons of concrete vs gravel shed foundations. You may also find our shed footings guide to be a useful resource in determining whether your shed should have a more permanent foundation.

Given their versatility, our customers have found an increasing number of uses for gravel pads even beyond shed foundations. We’ve seen them used for everything from gravel bases for hot tubs to gravel patio fire pit areas to gravel areas under decks!
So, now that you’re (hopefully) convinced that gravel is the way to go, here’s how to install your gravel shed foundation, step by step.
Note: If your local regulations require some type of frost-proof footings, we recommend combining your gravel shed foundation with concrete shed piers. If you’re considering this approach, be sure to also read our guide on how to build shed foundation piers before starting to build your shed foundation.
Step 1: Select the site for your gravel shed foundation
There are a number of factors that go into selecting the best site for your shed and its foundation. There might be one really obvious location on your property, but if not, here are some factors to consider:
1. Topography
The layout of your yard can make or break your shed foundation (and shed for that matter). Ideally, your shed foundation should be at:
a. A site with good drainage
If possible, your shed should be at the highest spot in your yard. That’ll keep water draining away from the shed and everything inside it. If it doesn’t make sense to put your shed at the highest spot in the yard, choose another location where water can drain away. You’ll avoid flooding your shed and discourage rot, mold, and mildew from taking over.
b. A site that’s not too sloped
With drainage in mind, it might be tempting to choose a site on the side of a hill. Don’t do it! (At least if you can help it.) Keep in mind that the steeper the slope you build on, the more you’ll have to dig out/build up to make your shed foundation level. A gentle slope is better; an almost level site is best.
c. A site on undisturbed ground
Keep your shed foundation away from areas where there’s been any digging/excavation in recent years. You don’t want to install your foundation only to have it start settling. This is especially important if your home was recently built; make sure you don’t pick a spot that was excavated during construction and just recently backfilled.

d. A site without obstructions or debris
This one is pretty straightforward. If you have to dig up stumps, remove brush, or otherwise clear the site, you’re in for some extra work and sweat, especially if you’re working with hand tools.

e. A site with good lighting
If your shed will have windows, it doesn’t make sense to put it in a shaded area. Think about where the shadow of your house will fall, as well as the shadows of any trees or woods around your property. Plus, more sunlight reduces the risk of algae or mildew taking up residence in/on your shed.

2. Utility Lines
Here’s a fact: if you stick a shovel into a gas or electric line, your day is going to get a LOT more complicated. When planning where to put you’re shed foundations, make sure you know exactly where your utility lines are. You probably won’t need to dig that deep for a shed foundation, but the stakes that fasten the perimeter lumber could go deep enough to hit something. It’s always better to be safe than sorry!
811 is the nationally designated phone number for requesting utility companies to mark lines on your property. It’s a completely free service to you as a homeowner, so by all means, take advantage of it! Someone once said: “Call 811 now so you don’t have to call 911 later!”
3. Local Ordinances
Many townships and boroughs have specific regulations which govern where outbuildings can be placed on a property and what percentage of the property or yard those buildings may cover. Be sure to research your local ordinances, zoning regulations, and/or building codes to make sure you’re in compliance. Specifically check:
a. Setback
This covers how far your shed foundation must be from primary structures, roads, property lines, and easements, like overhead power lines.
b. Footprint
This governs what percentage of your yard or property can be covered by your new shed.
c. Frost Proofing
If you live in an area that experiences significant levels of frost during cold months, there may be regulations regarding exactly what type of foundation and/or footings your shed will need.
One option (which we’ve done numerous times for past customers) is to install concrete shed piers at each corner of the shed foundation and then build a gravel shed foundation around the piers at the same height.
d. Anchoring
Some municipalities may require your shed to be anchored through the gravel foundation to increase stability during high winds and storms.
Check first with your township/municipality to see what they require. If you’re buying a prefab shed, check with the shed company to see what anchoring system they offer or recommend that would meet local requirements.
If your foundation has concrete footers, you can simply anchor to those; otherwise, you may need to use an auger-style or pound-in stake anchoring system.
Oftentimes, regulations only apply to buildings over a certain size; if your shed is small enough it may be excluded. It’s always a good idea to check beforehand, though.
Keep in mind that if your property is part of a homeowner’s association (HOA), the HOA may have additional requirements for sheds and gravel shed foundations.
4. Accessibility
This one is a no-brainer. Think about the primary use for your shed and plan accordingly. If it’ll be for your garden tools, put it near…the garden! If it’s for household items, put it close to the back door. You get the idea…
5. Appearance
Finally, think about the aesthetics of your property. Where will your new shed look the best? Depending on how much effort is going into the exterior of your shed, you may want to place it where it can enhance the curb appeal of your home…an extra plus if you hope to sell your property sometime in the near future.
Note that some municipalities actually have specific regulations governing what materials may be used on shed exteriors that face public streets.
If you’d like more info on selecting a site, we have an entire article dedicated to choosing your storage shed location.
Step 2: Gather supplies for installing your gravel shed foundation
Once you have the site selected, it’s time to collect the supplies for installing your gravel shed foundation.
1. Tools for installing a gravel shed foundation
If you’re a seasoned DIYer, you’ll probably have most of these tools on hand already. While every part of the job can be done with handheld tools, there are a few power tools that will make the job much simpler and faster. If you don’t own them (or have a friend who does), you can rent them by the day at a fairly reasonable rate.
a. Tape measure
This one’s a given for any construction project!
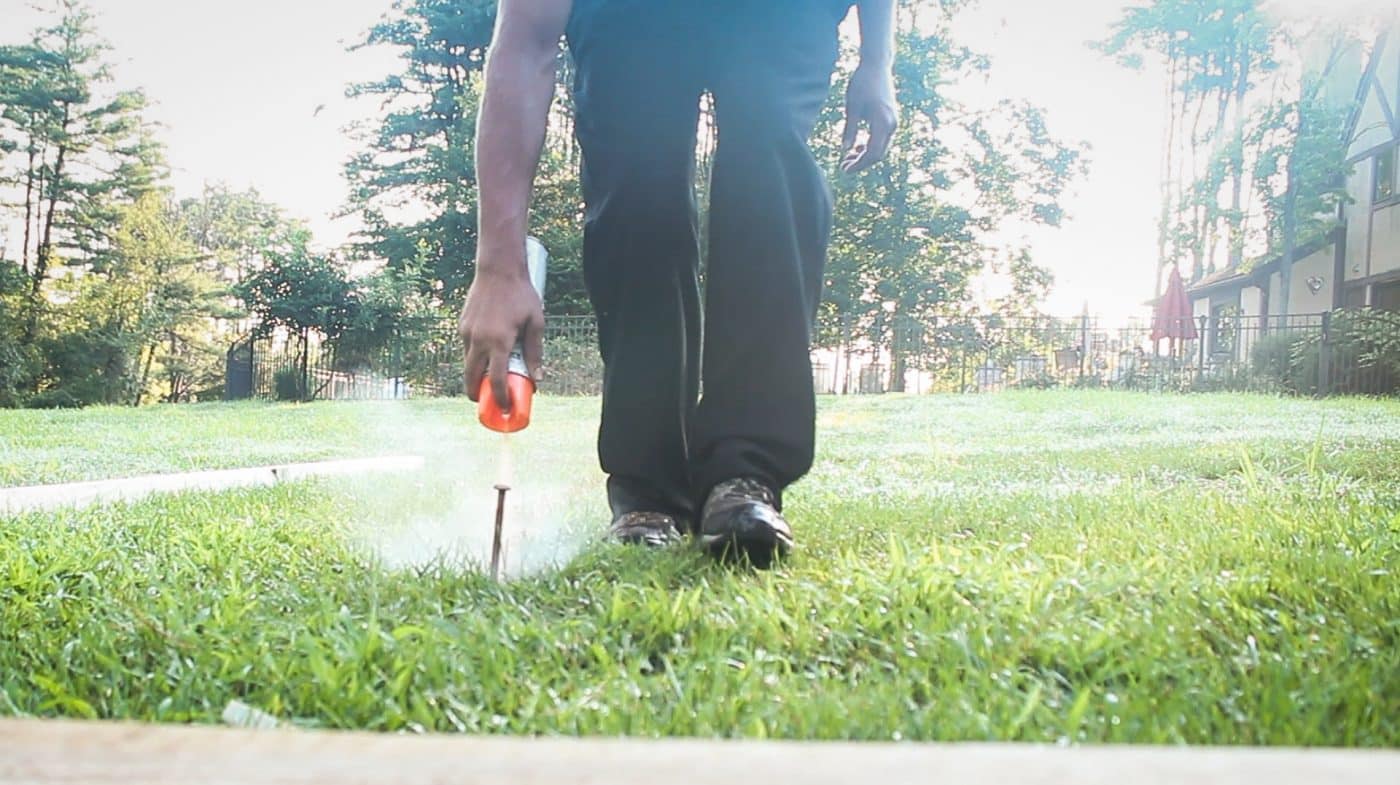
b. Marking paint
For marking straight lines for the edge of your foundation. Alternately, you could use stakes and string lines.
c. Level
A carpenter’s level (stick level) will be key to the success of your gravel shed foundation installation. It’s ideal to use a level that is at least 48” long.
d. Drill w/ ½” auger bit
This will be for drilling holes to stake down the shed foundation perimeter. The auger bit should be at least 18” long.
e. Sledgehammer
For staking down the foundation perimeter.
f. Circular saw
A power saw will speed up cutting the lumber for your perimeter. If you don’t buy precut stakes, you may also want a metal-cutting blade for cutting rebar stakes to anchor the perimeter.
g. Screw gun
Screwing the corners of your perimeter together before staking will keep things much tighter for the life of your gravel shed foundation. You could also use your drill for this.
h. Staple gun/hammer tacker
Used to fasten the stabilization fabric to the foundation perimeter before you add gravel.
i. Shovel
Whether you end up doing all the excavation by hand or just use the shovel to clean up the edges, it’ll be your best friend for this project.
j. Rake
For raking gravel of course! This will make it easy to get your gravel level before you compact it. A concrete rake is ideal, but a landscape rake or dirt rake could also work.
k. Tamper
This is to compact the gravel and lock it into place.
l. Wheelbarrow
This will make hauling and spreading gravel much easier than using only a shovel.
m. Personal protective equipment
You’ll need hearing and eye protection when using power tools. Work gloves are also strongly recommended.
n. Laser level (optional)
While a typical straight level is useful for leveling in one direction, a laser level can be extremely useful for finding the overall slope of your gravel shed foundation location. If you don’t have your own laser level, you may know a landscaper or contractor who would let you borrow theirs for an hour or two. Just remember to ask nicely!
o. Mini skid steer (optional)
A mini skid steer will speed the job up A LOT. This is especially true is your gravel shed foundation will be installed on a slope. Mini skid steers can be rented for about $200-$250/day or about $700/week.
p. Plate compactor (optional)
To really get your gravel shed foundation compacted well, there’s nothing better than a gas-powered vibrating plate compactor. It will not only save you a lot of time with the hand tamper, it will also pack your gravel much tighter and make a firmer base for your shed. You can usually rent a vibratory plate compactor for about $80-$100/day.
2. Materials for installing a gravel shed foundation
Once you have the tools collected, it’s time to gather (or plan for) the materials you’ll use to actually build your gravel shed foundation. You may want to do steps 3 and 4 first, in order to get a better idea of how many materials you’ll need to buy.
a. Pressure-treated lumber
Pressure-treated lumber is the material of choice for building the perimeter/retaining walls for your gravel shed foundation. In fact, some municipalities may even require that you use pressure-treated lumber.
When purchasing lumber, choose a size at least 4×4 or larger and make sure that it’s not only pressure-treated, but also rated GC (for “ground contact”). Here at Site Prep, we use 4×6 GC pressure-treated lumber for all the gravel shed foundations we install.
For a shed pad on level ground, you’ll need lumber equal to the total perimeter length; for a pad on a slope, you’ll need to buy extra for each additional level you need to build up.

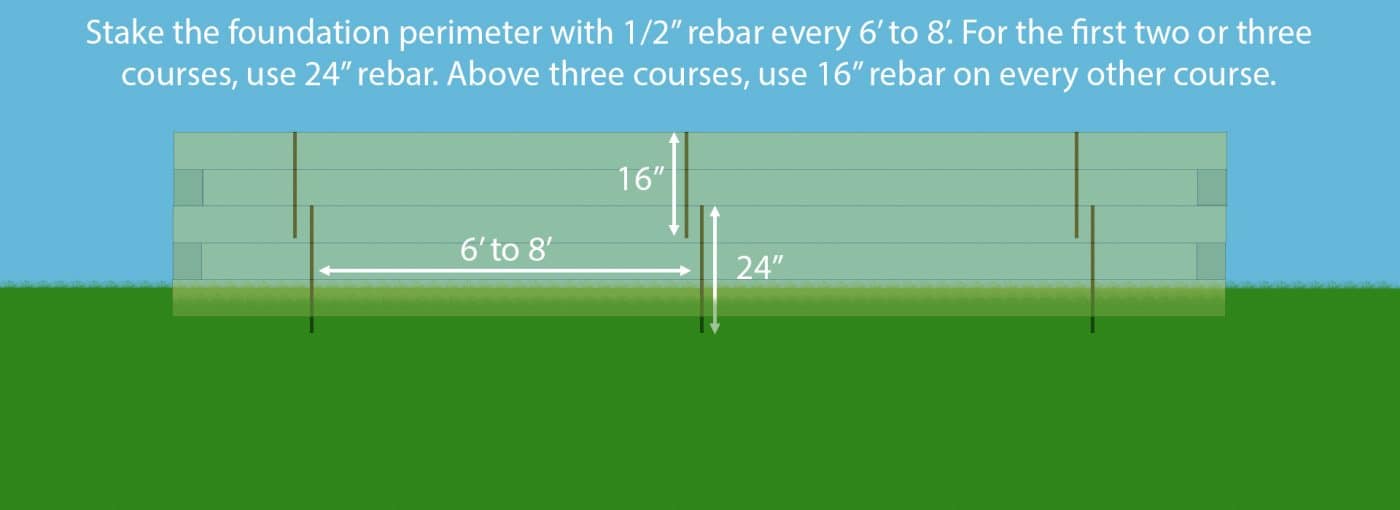
b. ½” rebar
You’ll use 2’ pieces of rebar to stake the perimeter lumber down into the ground. If your perimeter lumber will be built up more than 2 or 3 layers, you’ll also want some 16” rebar stakes for fastening multiple layers of lumber together.
You can either buy rebar precut at 2’ or buy longer pieces (up to 20’) and cut them to length yourself with the circular saw and metal-cutting blade. Use hearing protection when cutting metal!

c. 4” exterior screws
You’ll use these to fasten together the corners of your perimeter. Make sure the screws you choose are rated for exterior use and contact with pressure-treated lumber. Screws should have hot dip galvanizing or equivalent coating, like polymer. A bugle head design is ideal for countersinking into the wood. At Site Prep, we use 4” Grip Rite exterior screws.

d. Stabilization fabric/geotextile/weed barrier
There are a couple of reasons to use a stabilization fabric or weed barrier when installing your gravel shed foundation.
For one thing, it helps prevent weeds from sprouting up and taking over your shed pad.
Second, it helps to separate the gravel from the dirt beneath it, adding an extra level of stability to the finished foundation. Keep in mind that the fabric you choose will need to be strong enough to support the weight of the gravel and the shed without puncturing.
At Site Prep, we use a woven stabilization fabric with a Class 3 rating according to the American Association of State Highway and Transportation Officials (AASHTO) M288-17 standards. A woven Class 3 fabric has a tensile strength of 200lbs and a puncture strength of 90lbs and is designed to be used in road construction.
e. Crushed stone
This is going to be the key ingredient of your shed foundation, so make sure you select the right type. There are a few important things to keep in mind when purchasing gravel for installing your shed foundation.
i. Make sure you use crushed stone, NOT actual gravel
This article is all about “GRAVEL shed foundations”, but it’s important to note that we’re actually referring to CRUSHED STONE. Real gravel (also referred to as river stone) is smooth and rounded on the edges.
DON’T use river stone for your gravel shed foundation. With its rounded corners, it won’t lock together properly when compacted, so it will continue to shift and settle once your shed is in place.
DO use crushed stone for your gravel shed foundation. Because it has jagged, uneven edges, it will lock together tightly when compacted and form a firm base for your shed.
ii. Make sure you choose the correct type of crushed stone
Crushed stone comes in a variety of sizes and types. The best type of crushed stone for a gravel shed foundation is ‘¾” clean’, sometimes also referred to as ‘clean stone’, ‘¾” washed’ or ‘#57’, depending on the supplier. ‘¾” clean’ is stone that has been screened through a ¾” square screen and has been washed to remove stone dust and other residues.
It’s important to buy ‘clean’ stone for installing a gravel shed foundation. Some people recommend using a crushed stone mixed with stone dust or ‘fines’ because it packs down harder. (These types of stone are sometimes referred to as ‘crusher run’, ‘#411’, or ‘#21A’, depending on the supplier.)
The problem with using ‘crusher run’ stone for a gravel shed foundation is that the mixture of stone and dust will pack TOO HARD, preventing water from draining through the shed foundation properly and causing puddling and/or runoff. ‘Crusher run’ stone is great for uses where it will be driven on (like a driveway), but ‘¾” clean’ stone is the best for a gravel shed foundation.
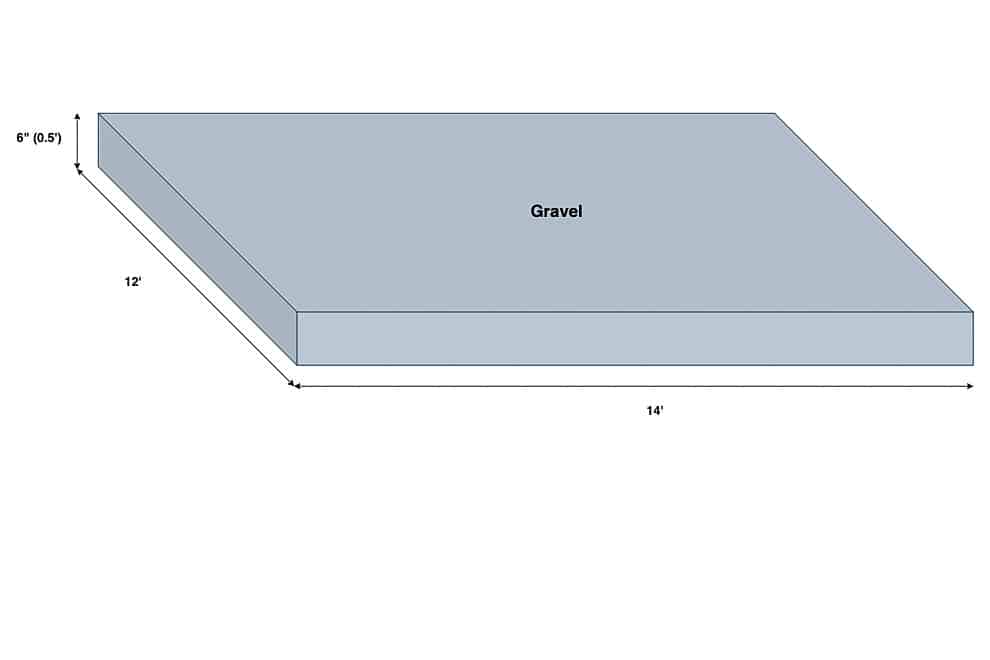
iii. Make sure you calculate how many cubic yards of stone to buy
You’ll want a minimum of 4” of stone at every part of your foundation, so figure accordingly. Take the width and length (in feet) of your foundation and multiply it by the average stone depth. Divide that number by 27 and you’ll get the cubic yards needed for your pad. For a more in-depth guide, check out our article on how much gravel is needed for a shed foundation.
Step 3: Mark the corners of your gravel shed foundation
Now it’s time for the fun to start! Grab a couple of stakes or some flags that you can use to mark off the corners of your foundation. (If you already have the 2’ rebar on hand, that can work well.)
It’s important that the outside edges of your gravel foundation be about 2’ longer and wider than the dimensions of your shed. That’s because you should have at least 12” of extra space on each side of your shed to allow for water to drain off properly and protect the bottom of your shed.

To get started, stake two corners of your shed foundation. If your shed will be next to a driveway, a fence, or anything else with a straight edge, you’ll probably want to mark the first side of the foundation parallel to that. You can then base the rest of your measurements off that straight line.
With two corners marked, you can measure the other side based off of those marks. Once all four corners are marked, take a quick diagonal measurement in each direction to make sure your corners are square. You can fine tune this later when you install the perimeter, but you want to make sure it’s close before you start digging.

When you’re happy with the placement of your corners, use the marking paint to paint a straight line along each edge of your pad location.
Alternatively, you can use stakes and string to mark the edges. If you do that, it’s a good idea to keep the stakes out a couple feet from the actual corners (as shown in the diagram) so they don’t become loose during digging.
Step 4: Measure the slope where you will install your gravel shed foundation
You’ll need to know what the slope is at your shed pad location so you can determine exactly where you’ll need to excavate and how many materials you’ll need. There are several ways to do this:
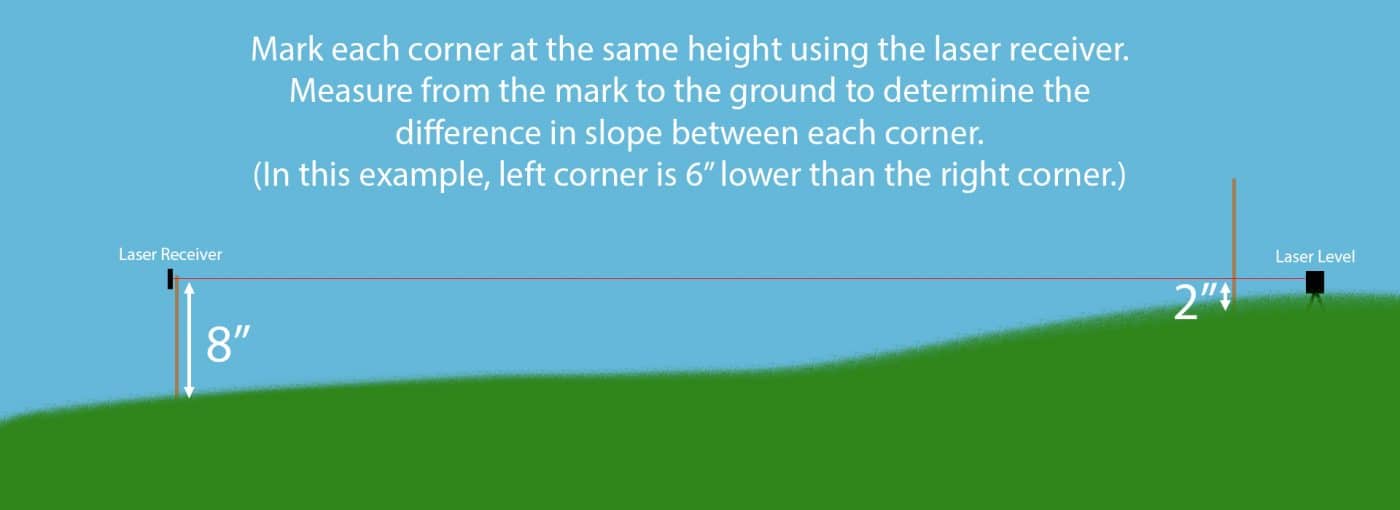
1. Laser level
A laser level or laser transit with a receiver is the simplest way to level your site and only requires one person. First, you’ll want to take a reading at the highest corner of your foundation site. Based on that first corner, you can determine the difference in slope at each of the other corners by measuring how far up the transit rod you need to move the laser receiver. If you’re not familiar with using a laser level, you might want to watch a video demo like this one or this one.
2. String level
This is another simple way to check for level. If you have stakes set up at each corner, simply tie a piece of nylon mason’s line (or other non-stretchy string) between the stake at the highest corner and the corner you want to measure. Attach a string level to the line and make sure it’s level. Then, simply measure down from the string at each corner to find the difference in height between those two points.

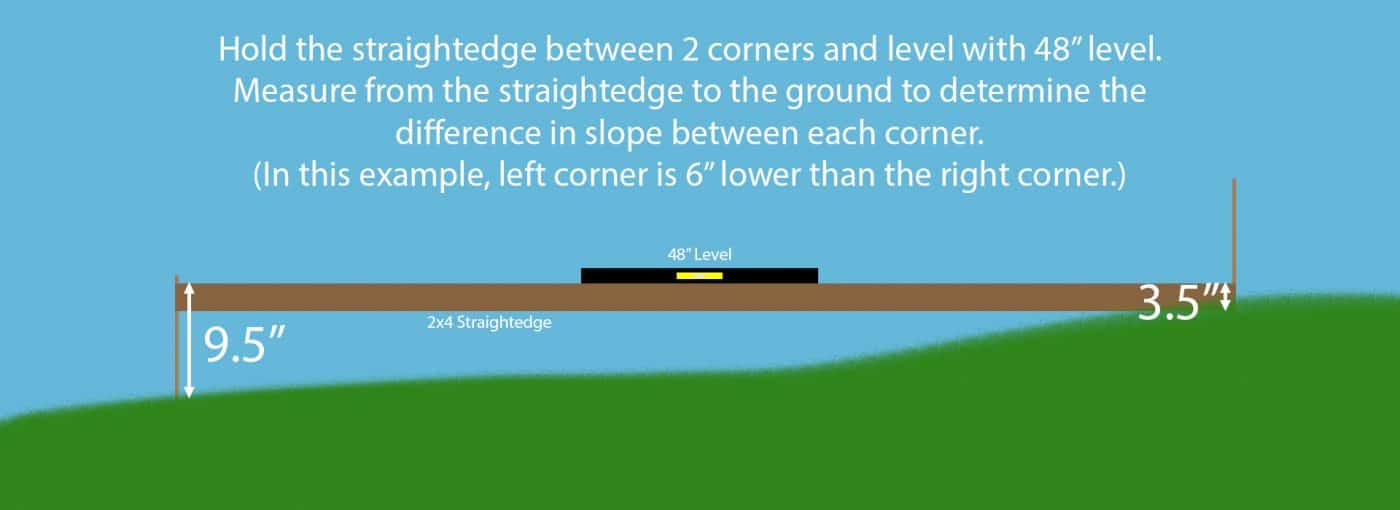
3. Straightedge and level
This method works well if your shed foundation will be relatively small. Find a very straight piece of lumber (a 2×4 or 2×6 works well) the length of one edge of your pad location. Lay your level on top of the lumber straightedge to effectively create a much longer level. Place one end at the highest corner of your site. Hold the other end of the straightedge level at the next corner and measure down to the ground to find the height difference between those two corners.
For some more tips and ideas on measuring and marking the slope for installing your gravel shed foundation, watch the tutorial below.
Step 5: Excavate the site for installing your gravel shed foundation
Often, steps 5 and 6 will take place simultaneously. Once you have the site marked off, it’s time to start digging. How you excavate depends on whether you plan to build up or dig down to make your shed foundation level.
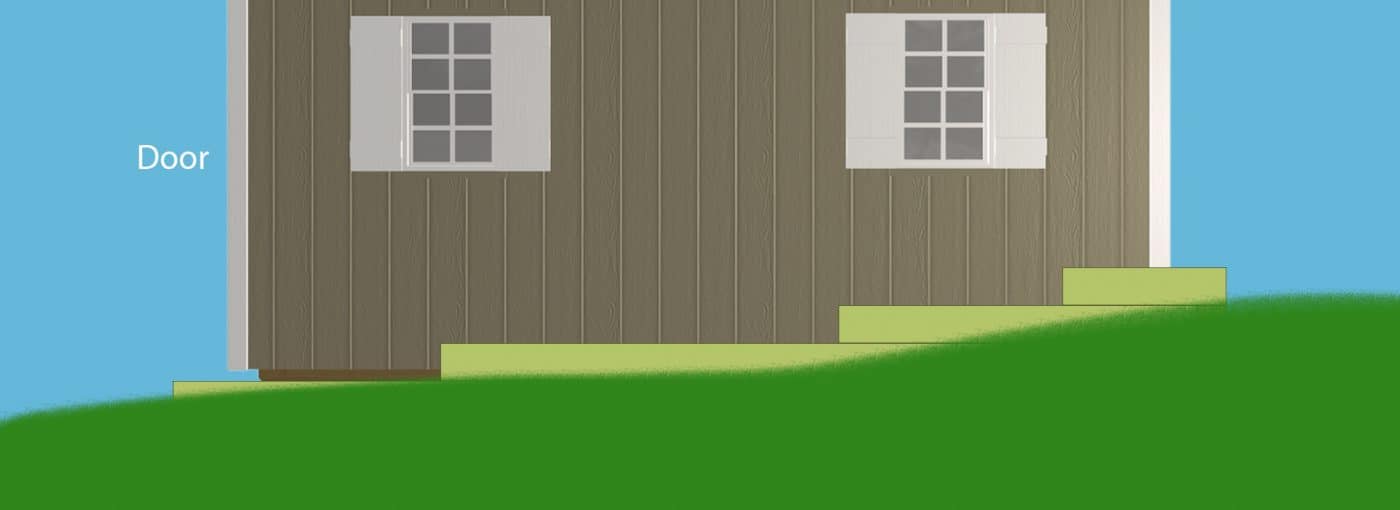
The key consideration is where your door will be placed. It’s ideal to get your door as close to ground level as possible. That will allow easy access for people, equipment, and whatever else needs to go in and out of your shed.
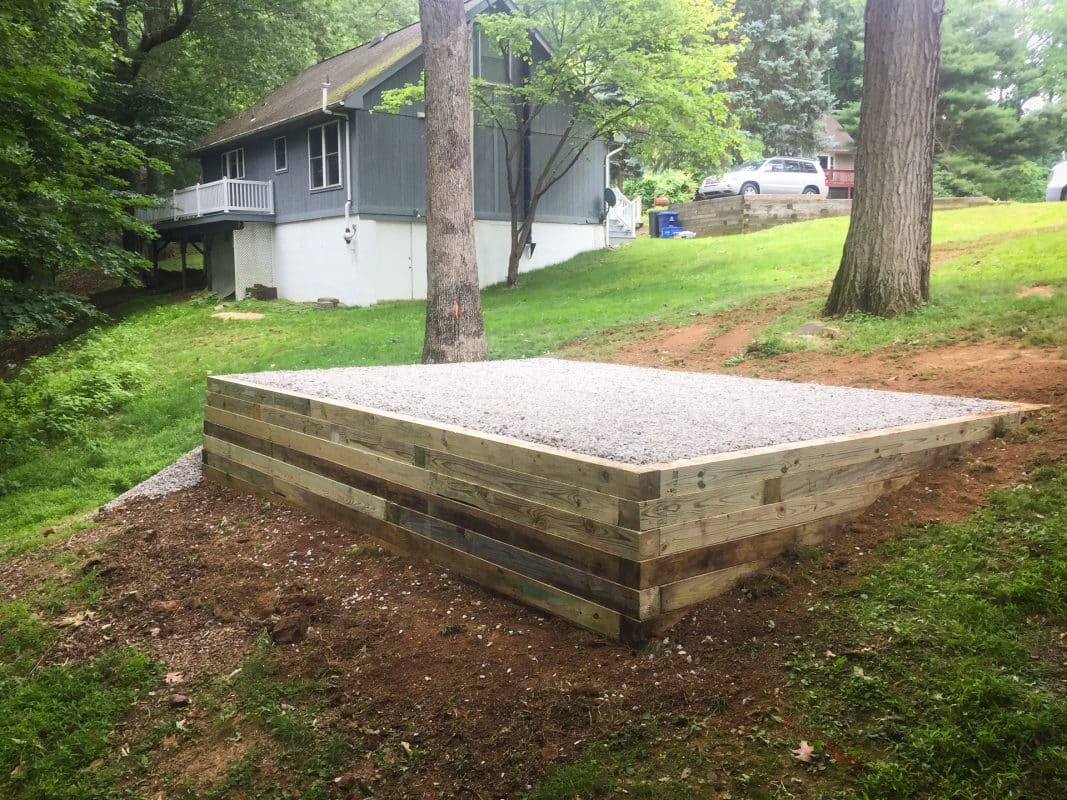
1. Build-up
If the door will be on the uphill side of your shed, you’ll want to build up the downhill end of your gravel shed foundation to make it level.

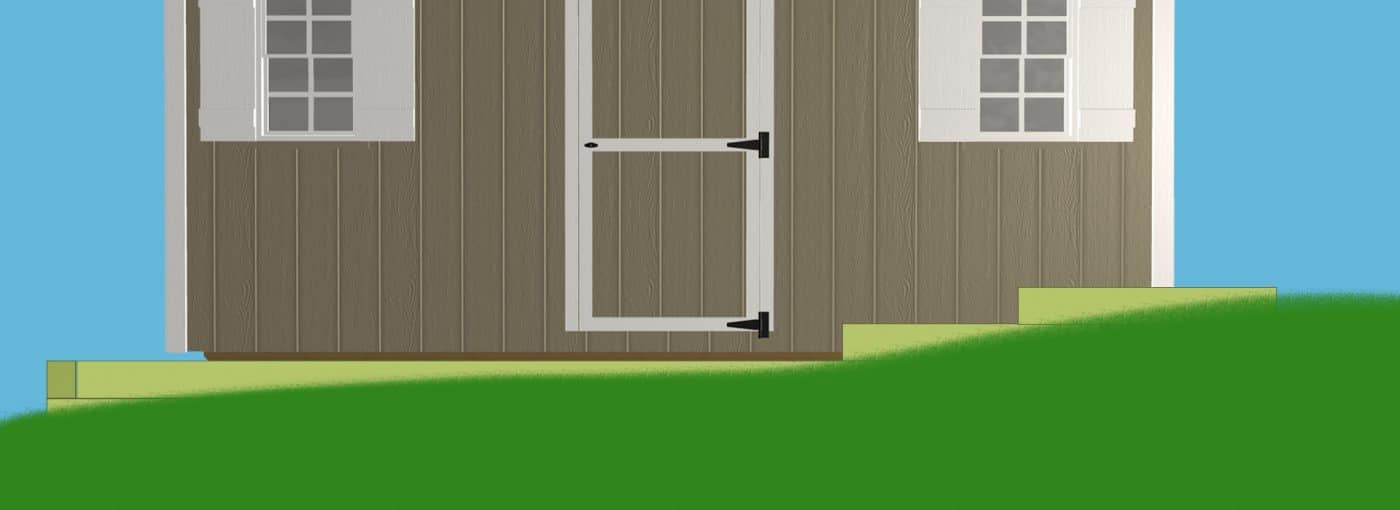
2. Dig-out
If the door will be on the downhill side, you’ll want to cut away into the slope to create a level area for your shed. This style is best for slight slopes or foundations that meet the edge of a driveway; for steeper slopes, use the combination
3. Combination
In some cases, such as on a very steep slope, you may build up one end of your shed foundation and dig out the other end. Dirt excavated from the uphill side can be spread in front of the foundation on the downhill side to create a dirt ramp up to the door.
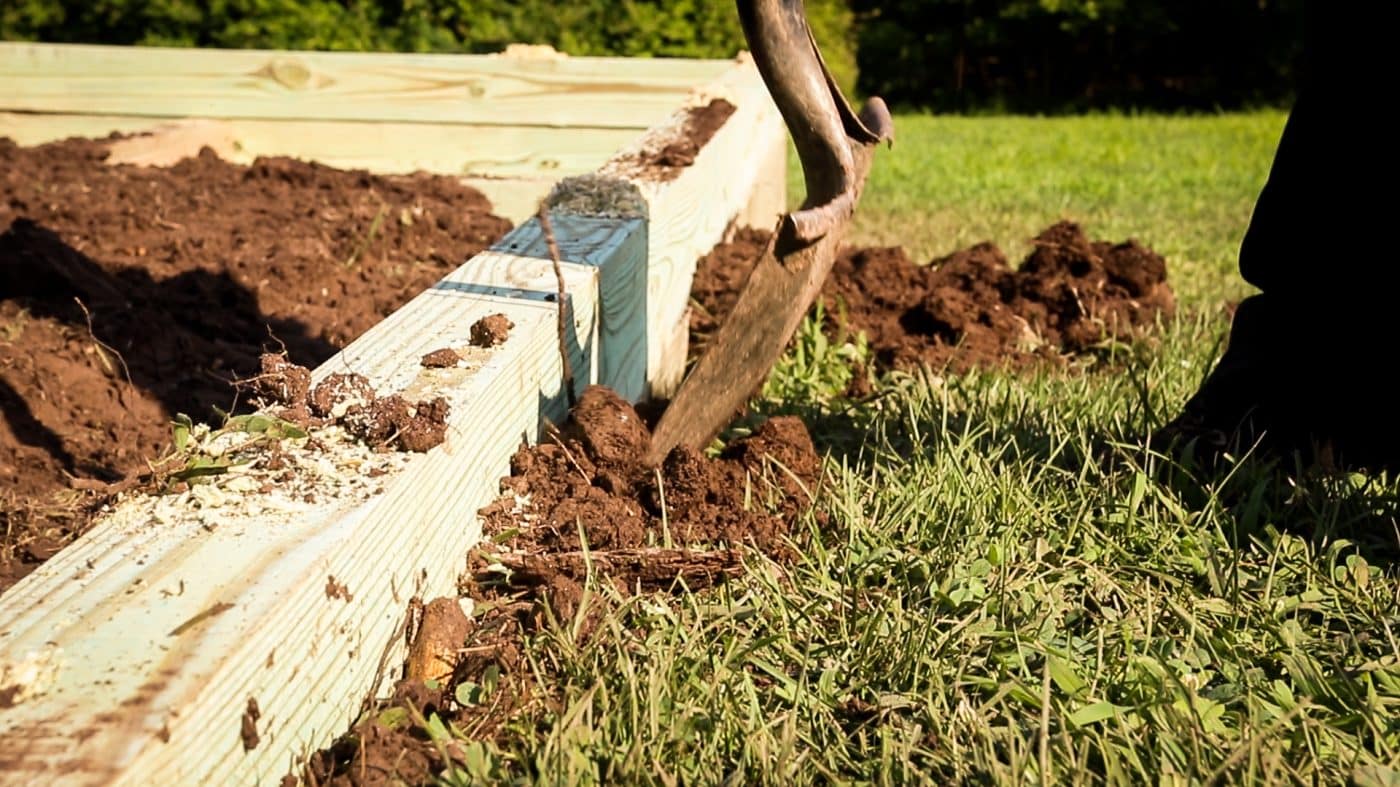
Regardless of what type of excavation your shed foundation requires, you’ll want to start at the lowest side of the site. Move along your marked line and dig away about 2”-4” of topsoil in a strip wide enough to lay down your first piece of perimeter lumber.
If you’re using 4x6s turned on edge to build the perimeter, digging down 2”-4” will allow the first course to stay several inches above ground level. Dirt excavated from the inside of the perimeter can be used later as fill on the outside to bring the lawn up to level with the edge of the foundation.

Once the first piece of lumber is in place and leveled, you’ll continue around the perimeter of your shed foundation, digging out the soil to make a level space for each piece of lumber.
Step 6: Build the perimeter for your gravel shed foundation
It’s extremely important to get your perimeter exactly level! A level perimeter will be the easiest way to level the gravel when you add it inside the foundation.
Continuing from the lowest side, dig out a strip of topsoil and add 4x6s (with the 4″ side turned down) the whole way around the perimeter or until the first course is below ground level.
You’ll add each piece of lumber as you excavate and level the spot for it. As you place each piece of lumber in the first course of the perimeter, check to make sure it’s level. If it’s slightly off level, you can use your sledgehammer to tap on the high end or add a little dirt back under the low end to correct it.

When there is at least one layer of lumber around the whole foundation, double-check your diagonal measurements to make sure your perimeter is square.
Once the first course of lumber moves a couple of inches below ground level (if your shed foundation is on a slope), you’ll want to start the second course.
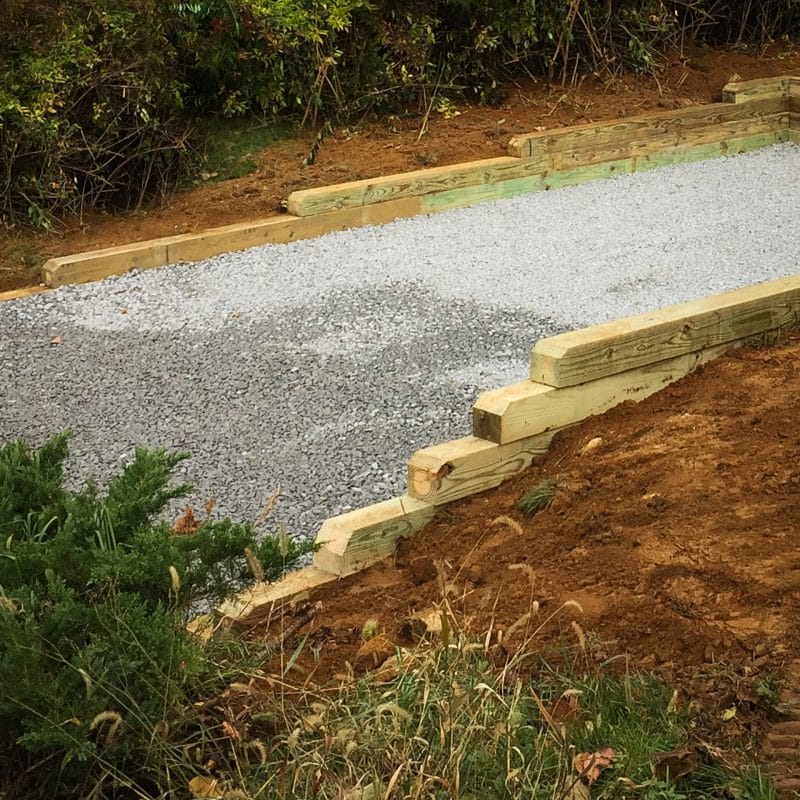
If you’re building up to level, start at the low end again, overlapping the corners of your lumber with the course below (like a log cabin corner). Continue the second course the rest of the way around the perimeter or until it too moves below ground level (at that point you’ll start the third course).

If you’re digging down to level, start the second course stepped back from the first to the point where one end is completely above ground level. Continue the second course the rest of the way around the perimeter or until it too moves below ground level (at which point, you’ll start the third course). You can cut a 45-degree dog ear on the exposed end of each course of lumber to create a more finished look.
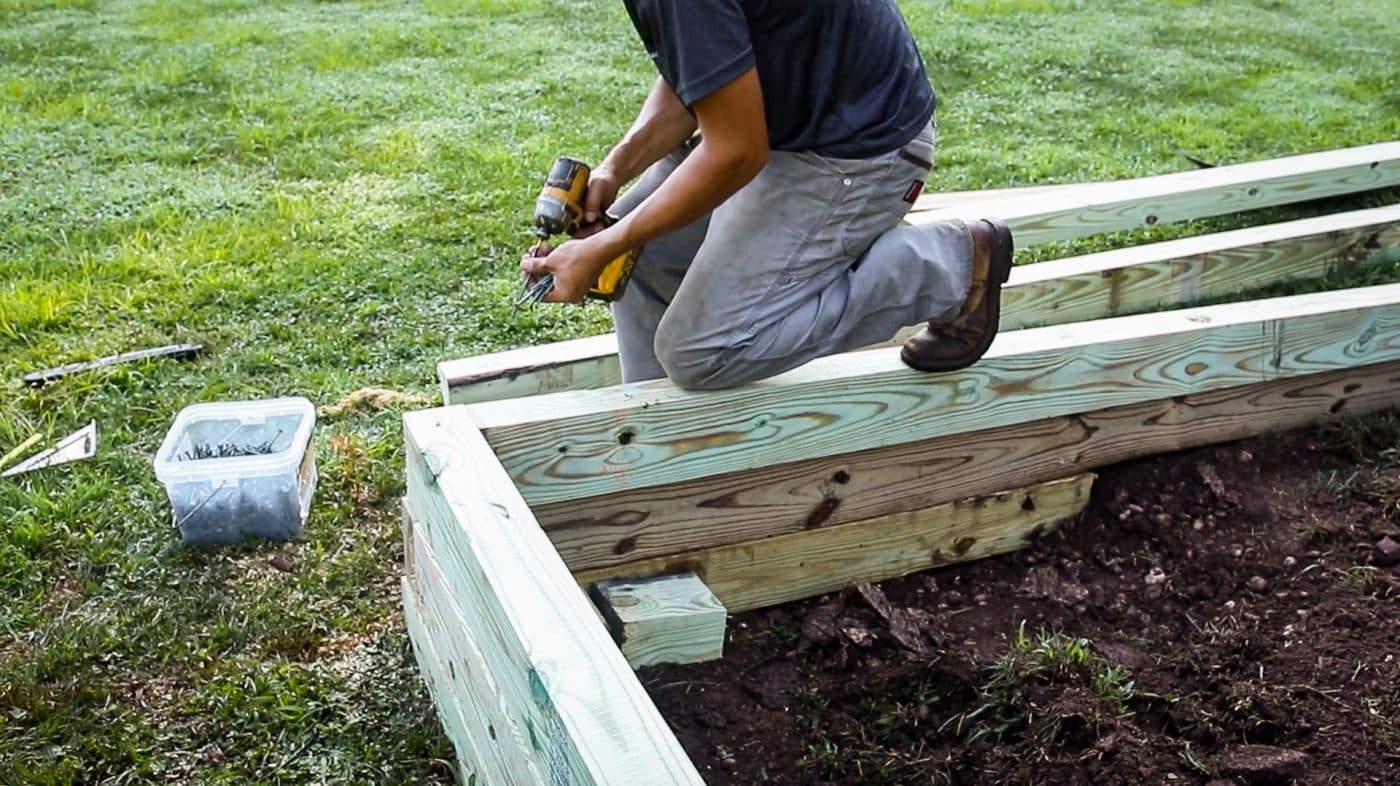
As you add each piece of lumber to the perimeter, use the 4” exterior screws to fasten it to the pieces next to and/or below it. It’s especially important to focus on screwing the corners together to keep them tight. Use 6-8 screws per piece of lumber per corner. Additionally, screw each piece of lumber to the course below it with two screws approximately every 2’-3’. This will assist the rebar stakes in keeping the perimeter from shifting.
Step 7: Add any necessary bracing to your gravel shed foundation
If the slope at the site requires one end of your gravel shed foundation to be built up, you may need to add bracing inside to help support it. At Site Prep, we typically brace shed foundation walls that are 16”-20” or higher. The longer the built-up wall is, the more important bracing is.
We use and recommend a style of bracing called a “deadman”. (Don’t ask us where the name came from!) In this design, the “deadman” (“deadmen” if there’s more than one) are pieces of lumber which are attached perpendicularly to the braced wall. On a built-up foundation, the “deadmen” are on the inside; on a dug-out foundation, they’re on the outside.
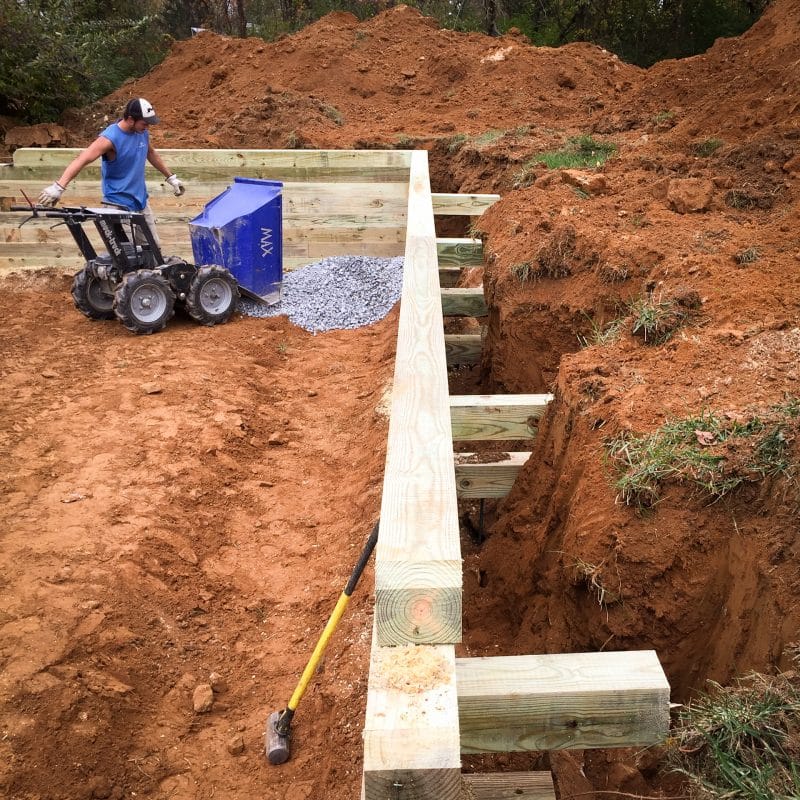
On lower applications, the “deadmen” may be fastened with screws to another piece of lumber running parallel to the braced wall. On higher walls, the “deadmen” are actually built into the wall. Either way, use plenty of 4” screws to fasten the ends of the bracing into the wall of the perimeter.
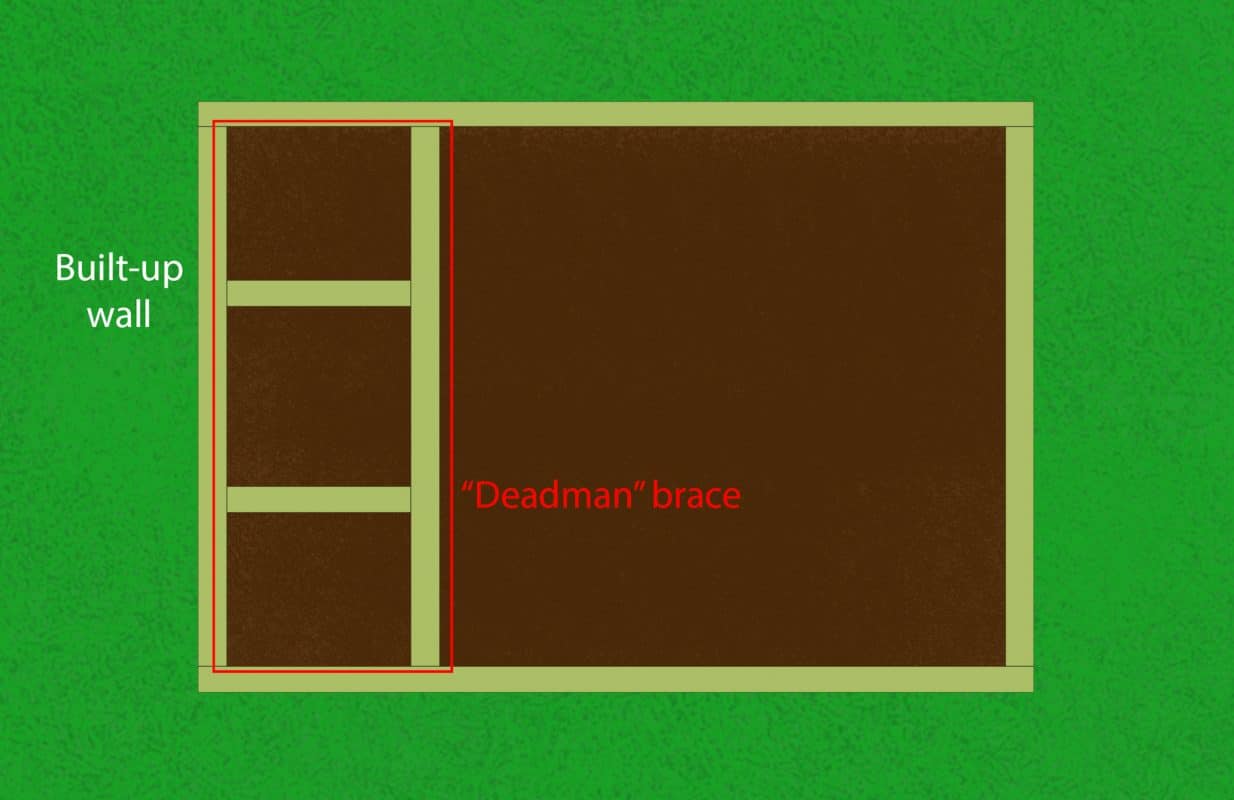
Once the foundation is backfilled and the gravel is added, this “deadman” brace will help to tie everything together and keep the perimeter wall from pushing outward (or inward) over time.
Step 8: Anchor your gravel shed foundation with stakes
Once your perimeter is completed or you have 3 layers of lumber in place, use your drill and ½” auger bit to drill holes through the perimeter every 6’-8’.
Pound 2’ rebar stakes through the perimeter and into the ground. If you didn’t buy rebar precut into 2’ stakes, you can cut it yourself with your circular saw and a metal-cutting blade. You could also use a reciprocating saw or a grinder. Always wear ear, eye, and hand protection when cutting rebar!
If your foundation perimeter is more than 3 courses high at any point, drill again at every other course of lumber (starting at the 2nd course) and use 16” rebar stakes to fasten higher courses of lumber to the lumber below.
Step 9: Level and backfill the dirt inside your gravel shed foundation
Now that the perimeter is in place, you can finish removing the topsoil and excavate any remaining high spots inside the foundation. It’s important that the dirt inside your shed foundation is at least 4” below the top of the lumber perimeter to allow room for the gravel.
If the site is sloped, some people recommend adding perforated drainage pipe at this point to drain water from inside the downhill end of your foundation into the lawn. However, if you’re using ¾” clean stone as recommended, additional drainage is completely unnecessary since water will drain straight through your foundation and into the ground below. The only time we add drainage is uphill on the outside of a dig-out foundation to channel water around the foundation instead of onto it, but even that scenario is very rare.
Use extra topsoil to fill any gaps between the lawn and the outside of the foundation. If your site is nearly flat, you can use the extra dirt to slope the lawn up to the top of the perimeter. That will make a nice, tight line between your lawn and the edge of the shed foundation. If your site is sloped, use extra dirt to even the grade, especially on the side toward the door.
Make sure all the dirt inside your shed foundation is well-packed so it won’t sink over time. Use a tamper if necessary. If you’re using heavy equipment, like a mini skid steer, you can use its weight to help pack the dirt.

Step 10: Add construction fabric to your gravel shed foundation
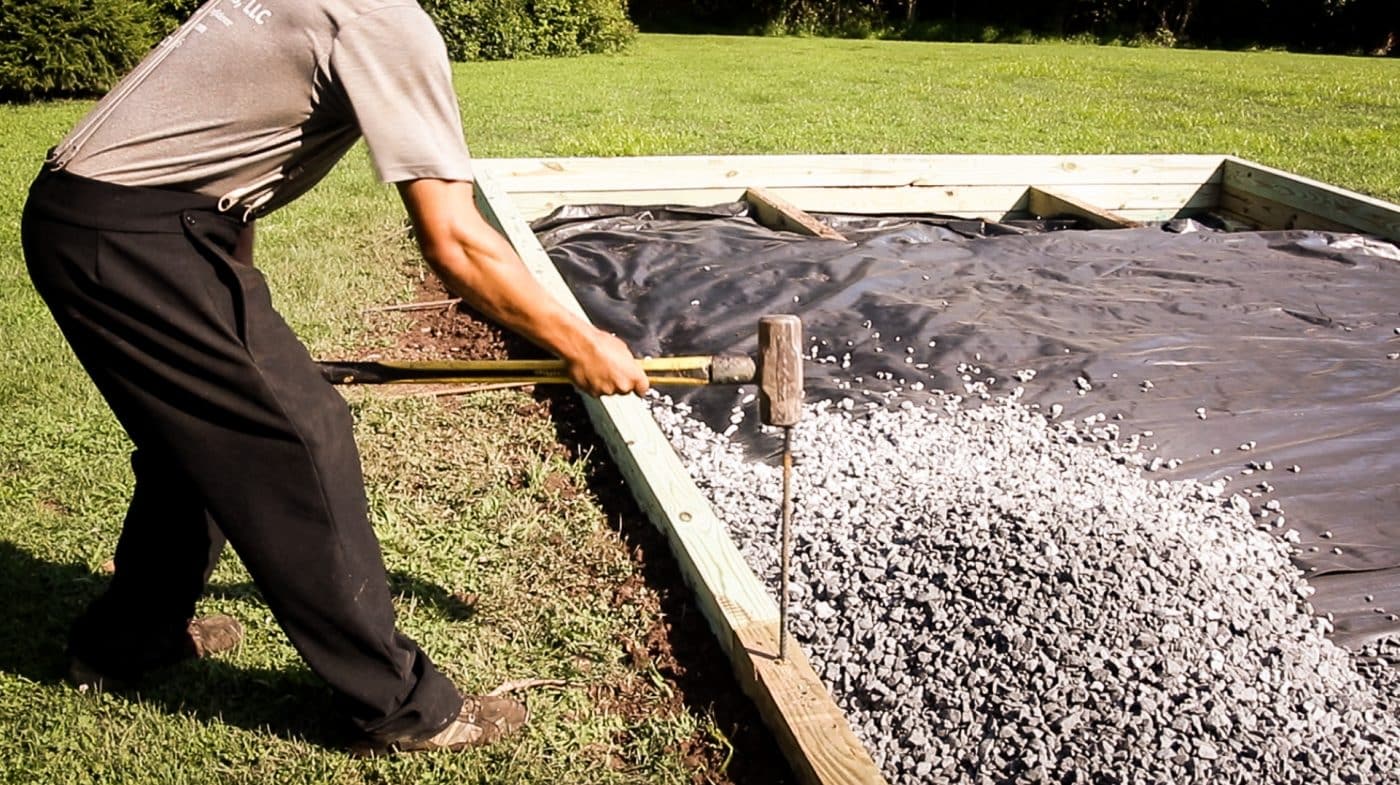
Once the dirt is level, spread the construction fabric/weed barrier out over the inside of your shed foundation. Fold a few inches of the fabric up the side of the perimeter and use a staple gun or hammer tacker to fasten it.


Pull the construction fabric tight over the dirt as you work your way around the perimeter of the shed foundation. If you added bracing inside your foundation you may need to slit the fabric to fit around it.

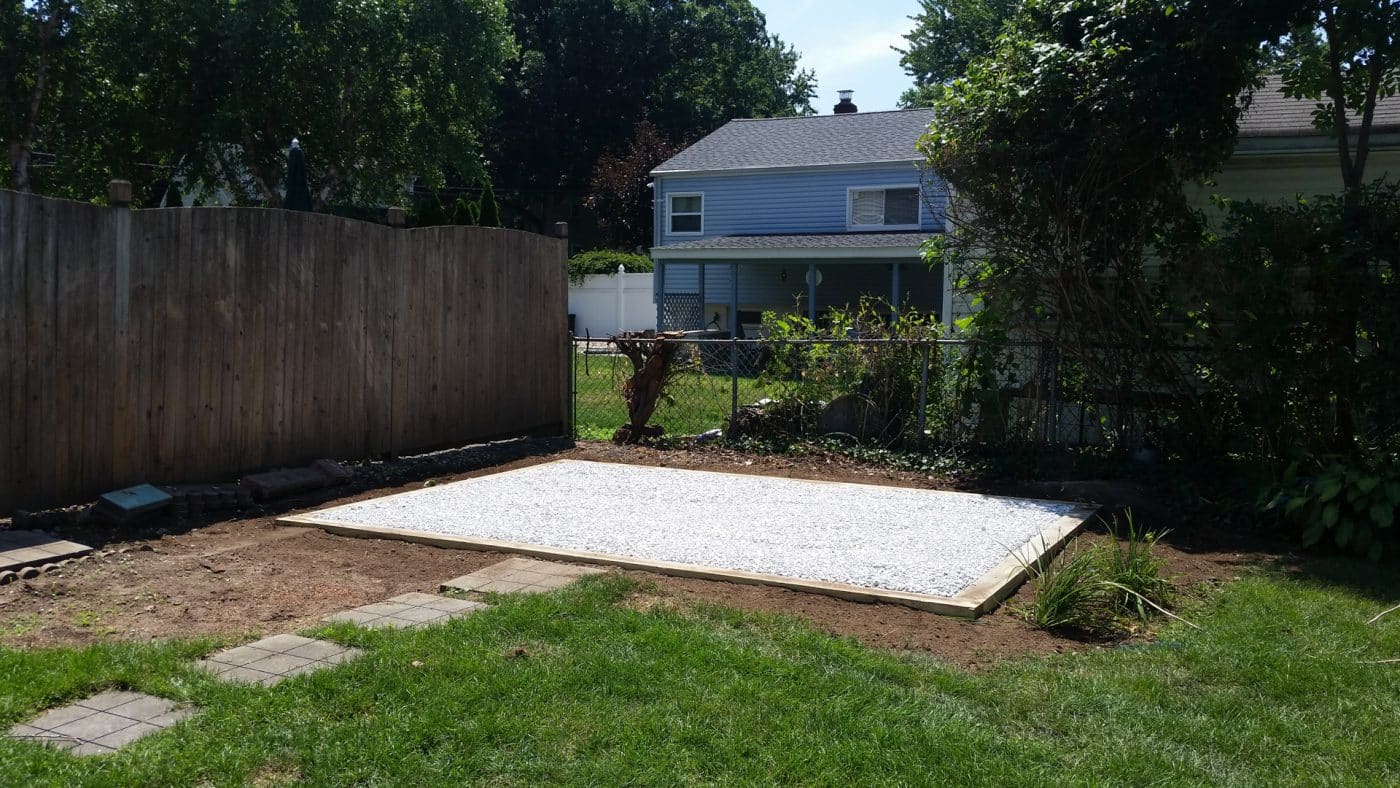
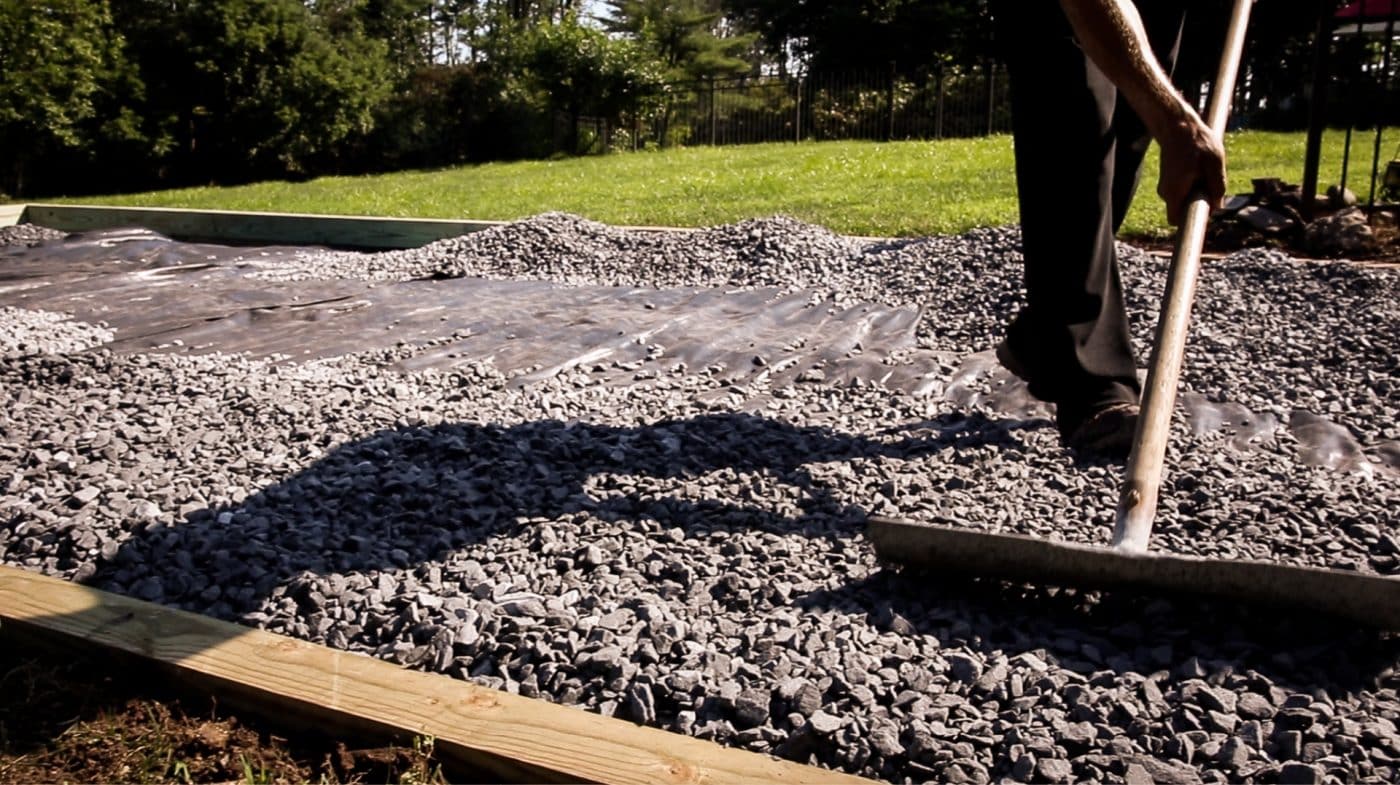
Step 11: Add gravel to your shed foundation
Finally, it’s time for the gravel! Dump the crushed stone inside the completed perimeter and spread it around with a concrete rake. To properly support your shed, it’s important that there is a minimum of 4” of gravel at every part of your shed foundation.

Since the lumber in the perimeter of the foundation is level, you can use it as a guide to level the gravel as you spread it around. You’ll want to get the gravel level before you begin tamping it.

In addition to a gravel rake, you could also use a straight piece of lumber like a 2×4 or 2×6 to create a screed board for leveling the gravel. Simply drag the screed board across surface of the foundation to push gravel from high spots down into low spots.
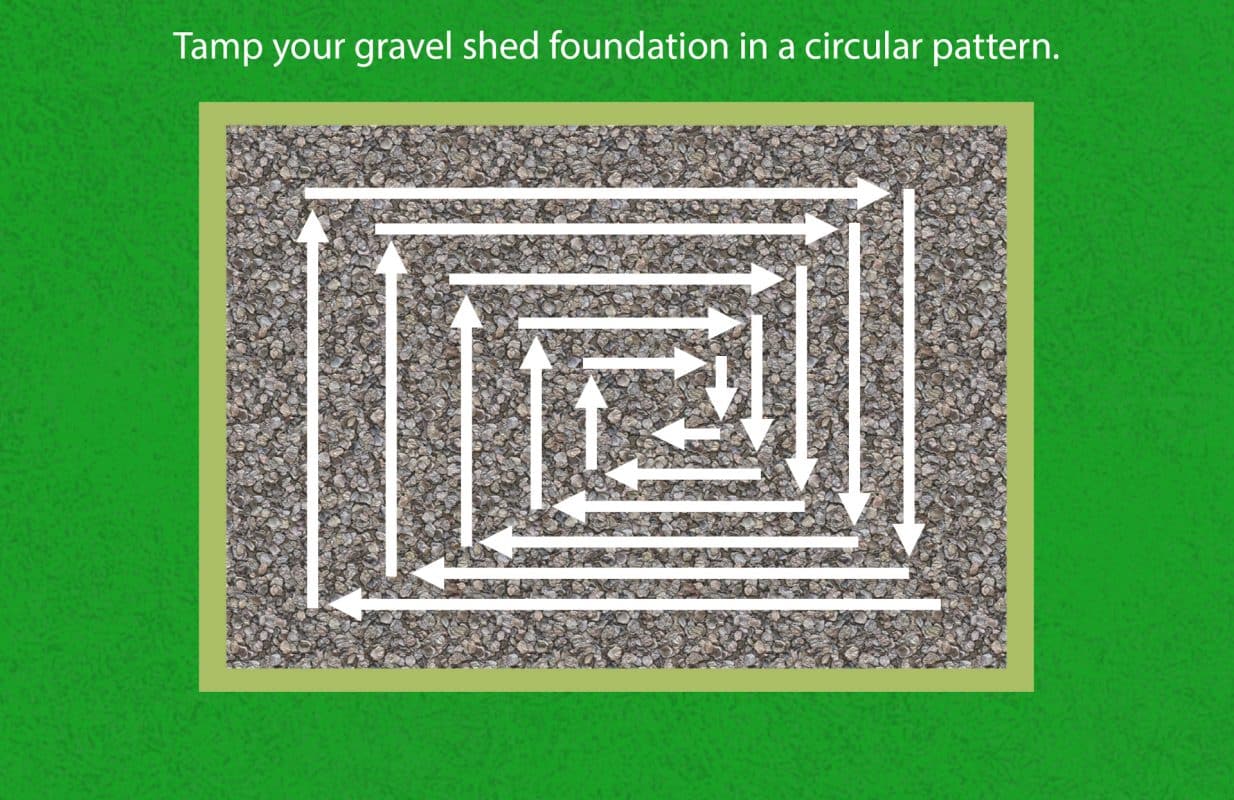
Step 12: Tamp your gravel shed foundation
This step is crucial. Tamping the gravel is what will lock it in place and create a strong foundation for your shed for the coming years.

We’ve found it best practice to start about 12” in from the perimeter and work inwards. Use a circular/spiral pattern rather than going back and forth. That will keep everything packed evenly across the entire foundation rather than pushing the gravel to one side.


Once the center is tamped tight, go back to those outside 12” and tamp them as well. This keeps the gravel at the edge packed tight and level between the perimeter and what’s already tamped in the center.
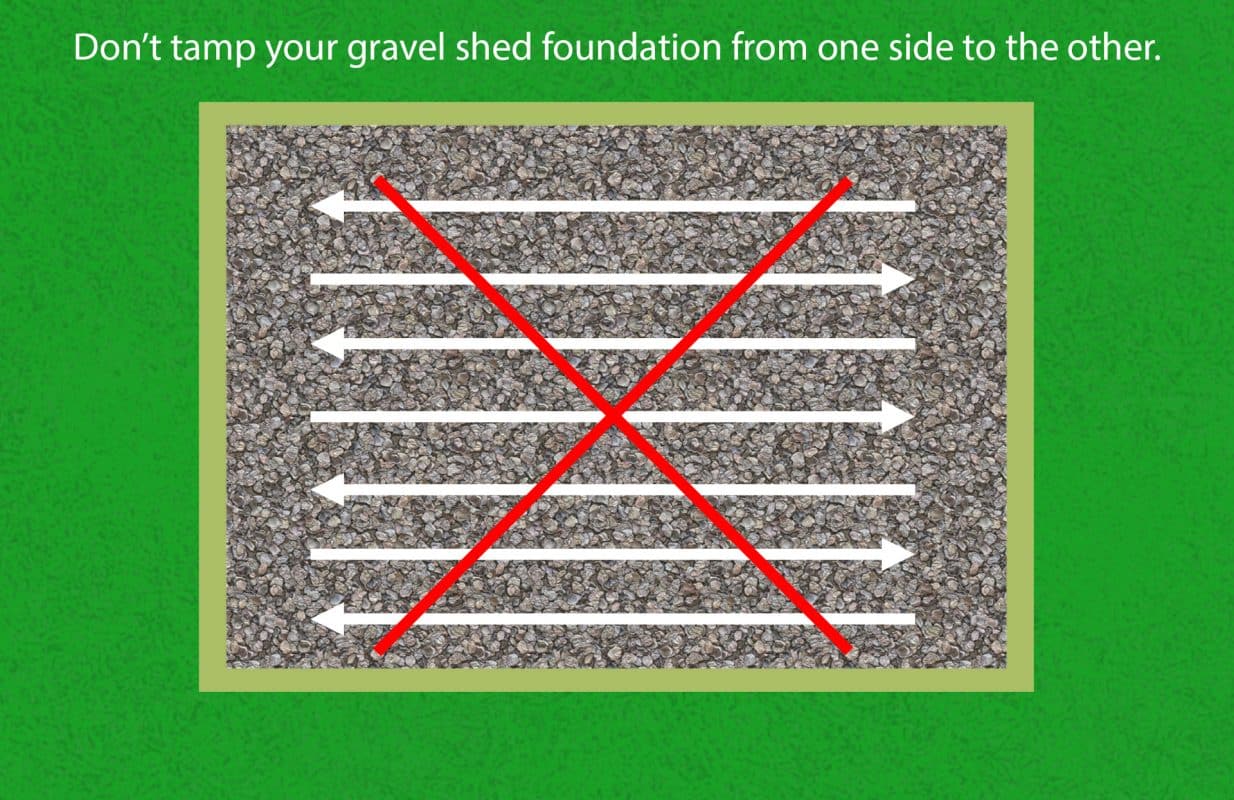
‘¾” clean’ stone is already 90%-95% compacted when it comes from the supplier, so you should only need to go over it once with the compactor.
Congratulations, your gravel shed foundation is installed!
Of course, if you decide that installing a gravel shed foundation is more than you want to tackle yourself, you can always hire a gravel shed foundation expert to install it for you. Just make sure the company you choose is familiar with gravel shed foundations specifically.
If you’re in the northeastern United States, we’d be glad to give you a free estimate ourselves.
If you appreciate content like this and want to support its creation, follow us on Facebook or subscribe to our YouTube channel. Thanks!
Won’t the pressure treated lumber rot faster since it’s in direct contact with the ground?
How long does it take to build a standard 12 foot frame and fill it?
How level does the ground need to be (inside the shed area) before adding the construction fabric (assume no skid steer or machine tampering)?
Thank you, so much you guys; this video is excellent and super detailed. Ezy to flow step by step, excellent education.
You’re welcome! Glad you found it useful!
Hi Will, it’s a good idea to get it fairly level (within a few inches) before adding the fabric and stone.
For our crews (who do it every day) it takes two guys 1-2 hours, assuming the area is pretty level. If you’re doing it yourself, it should generally be half a day or less.
Hi Herbert,
Thanks for your comment!
It’s important that you get pressure-treated lumber that’s rated for “ground contact.” That being said, it won’t rot any faster than a fence, deck, or other structure with posts in the ground.
Awesome website! Any tips for running electrical conduit to a shed that is built on a gravel bed that is 12″ wider than the shed?
Hi Matt,
Most prefab sheds that include electric have the conduit running out the side above ground, so it often doesn’t need to go through the foundation at all. In cases where the conduit does go through the shed foundation, we use an “L”-shaped piece of conduit with the ends taped off, long enough that the end extends at least 5″ above the completed pad. After excavation, we place the conduit so one end is at the proper location relative to the shed and the other exits beneath the lumber perimeter. You can see a photo of a completed pad with conduit here: https://www.siteprep.com/wp-content/uploads/Unorganized/20190404_132334.jpg
Hope that’s helpful!
This is the best info I’ve been able to find online. Thank you. I’ve placed the 4x6s. My grade is on a slight slope. If I place the gravel now, one side will be 5″ deep and the lower side will be 10″ deep. Will that be a problem or should dig out the high side and place the fill on the lower side to produce a constant depth of approximately 7.5″?
Do you not recommend tying the corners together with rebar? At least for the first 2-3 courses? Your rebar graphic above doesn’t show placement at the corners. Awesome guide btw, thanks!
If on level ground, how many layers of the wood perimeter do you need? It seems like the article was saying at least 3. Thanks.
Hi Robert, it’s fine the way you have it, as long as there’s at least 4″ across the entire pad. 3/4″ clean stone packs tightly, even when 12-24″ deep. It’s better to leave the soil undisturbed, as backfill will have a greater chance of settling than the stone itself.
Hi Mike, we tie our corners together with screws and put our first rebar stake in about 12-24″ from the corner. It probably wouldn’t hurt to add one in the corner, but not really necessary. In fact, you won’t get quite the same strength with a hole drilled that close to the end of the lumber…it’s prone to weaken as the lumber ages over the years.
Hi Aaron, you only need one course of lumber on truly level ground.
When you start at the lowest point w the timber,and stack each post, do you follow through
With each post (on both sides)all the way to the highest point in the ground, or do you cut sections, stacking to the highest point only going as far as the ground allows to the highest point?
Hi Allan,
I’m not 100% sure what you’re asking, but I’ll do my best to answer! If you are building the foundation up to level (if the shed door will be at the highest point in the ground) and the first course of lumber moves below ground level as you work toward the highest point, you can simply begin a new course of lumber. If you are digging the foundation out to level (if the shed door will be at the lowest point in the ground) you will need to continue the first course of lumber around the entire foundation. Hope that makes sense!
Do I need to remove the sod inside the perimeter prior to the geotextile fabric and stone? Or can I just scalp it with a lawnmower and spray round up prior to the geotextile?
Hi Murray, we often dig down 2″-4″ on a level site. That a) leaves a lower step-up to get into your shed and b) eliminates that top layer of topsoil that might be more likely to settle over time. That being said, you may be fine going right over the buzzed lawn if you have a high-quality geotextile. Make sure you’re able to get the crushed stone at least 4″ deep inside the foundation!
Great video and very well done! Is it fine to notch the timber ends instead of using butt joints? Also, is it ever wise to put gravel or a stone block under the timbers for leveling and drainage or is solid dirt is all you need?
Hi Warren, butt joints on the corners of the shed foundation are fine, but notching them shouldn’t hurt if you have the time and expertise to do it! Solid dirt is really all you need under the timber, assuming you remove the top few inches of topsoil.
Hi, how far does rebar need to go into ground? If you’re at 1 level using 4×4″, it shouldn’t need to go into the ground 20 inches, right?
Hi John, 20 inches is plenty. If the ground is level, you should be good with extending the rebar 12″-16″ into the ground.
I was going to go with A concrete base, but your video and this page has instantly convinced me to go with gravel. Fantastic video, guys. You’ve even made me feel confident to tackle this myself.
My only question is, I’d only need one course of timber. Should the top of the timber be level with the ground or should it stick out the ground?
Thanks again
Craig, that’s great to hear! We usually keep the edge of the timber 1″-2″ above ground; you can use the leftover dirt from excavation to fill the difference after the shed pad is complete.
Terrific vlog. Question:
18 months ago we stripped the topsoil and had a DG (decomposed granite) landscape installed. They dug out 4-5″ of soil, installed 2″ of 2-2.5″ gravel, 2″ of 3/8″ clean gravel, and topped with DG. Now I’d love to have a wooden shed installed. Hubby says if installed directly on top, it’ll sink. I think that its weight distribution over the gravel/DG substrate will support it just fine. We’re in SoCal, and get very little rain. Thoughts?
Hi JJ,
We don’t really work with DG, plus we’re on the east coast where the climate is quite a bit different, so it’s hard for us to give a definitive answer. That being said, we really don’t like putting sheds on bases with stone smaller than 1/2″ as it doesn’t lock together as tightly and can be more prone to shifting over time. If you want a compromise to firm your landscaping up a bit, you could think about removing just the DG and 3/8″ stone and adding several inches of 3/4″ clean over the larger gravel base.
As you mentioned, it is a different climate, so we can’t say for sure…and we definitely aren’t trying to take sides between you and the husband! ;D
Hope these ideas are helpful in your discussions. Good luck!
Hi, I live near salt lake city, Utah where frost heave could be an issue, but would rather do a gravel base for a 10×10 shed if its possible. Any thoughts? There are basically no requirements to make things up to code when I checked locally since they don’t regulate anything less than 200 sq ft. Just don’t want my shed to get too lopsided and not be able to open the door
Hi Trent, we build many/most of our shed foundations in frost-prone areas (PA, NJ, NY, MD, etc) and have found this foundation style to quite durable in both hot and cold conditions. In our opinion, it should not be an issue!
Site Prep crew – Exceptional content with fantastic detail. Can’t thank you enough for sharing your expertise with all us desperate DIY’ers these days!
I’m curious about a couple of things. I have a somewhat gradual sloping grade.. Thinking roughly 8-12″ total that I intend to excavate maybe no more than a 3rd or so and take the combination approach, where I build up a little and dig out. The reason for this is because I would prefer not to be dependent on the current grade and surrounding swell in any way, thus I figured it most beneficial to be off “grade” and off slope.
If I can better explain what I’m envisioning, an example you previously posted is the closest I’ve seen to what I have in mind > [Link deleted]
All that aside- I have a novice question of joining your butts to extend and reach length for a single-side of your perimeter, I don’t see where you speak to this in your guide and photos would suggest you’re literally just butting the two timber ends and presumably using your 4″ screws drilled at an angle to attach and extend (as if one solid length in lumber) – Is this accurate? Would you had any thoughts on whether to also affix using something like the Simpson Strong Tie HRS416Z Straps? Next question, in your example photo I relinked above, it looks like you installed a few inward facing deadmen braces in the front despite being such a short wall, am I seeing that right and if so, is it because its exposed and there’s no outward facing reinforcement behind? Curious if I should consider doing the same.. As a final two questions, any thoughts on lining the 2-4″ trench for the first course with the stabilization fabric? Curious if it could improve longevity and increase age against rot. Lastly, I just wanted to confirm you would not stack these courses in the traditional way of a retaining wall, in other words there is no need to stagger or offset each course beyond the last as you build up? Thanks again!
Hi Jimmy,
Glad you found the content helpful! Those are several good questions; we’ll take them one by one. (By the way, it seems the link you shared was removed somehow, so we weren’t able to see which job you were referring to.)
1. Lumber butt joints – You’re correct, we usually use 4″ galvanized screws at an angle to join the ends of the lumber together. Plus, the rebar stakes also help to keep them in place. The Simpson strong-ties you refer to might be overkill but certainly won’t hurt if you do decide to add them.
2. Bracing – We usually add bracing on any walls over 16″. With a deadman brace, you always add it to the inside of the exposed wall. The exact bracing scheme varies with each site; you can see examples of different bracing layouts here and here.
3. Adding fabric under the perimeter – The stabilization fabric we use is porous, so it won’t do much to protect the lumber from moisture. Again, it’s probably overkill but won’t hurt if you decide to add it under the lumber.
4. Offset courses of lumber – We actually do offset each course of lumber, though only by a fraction of an inch on each course. If you offset them by too much, it will cause issues when you go to drill and stake the perimeter. Here’s one example where it’s a bit easier to see the combined offset on a higher wall.
Hope those answers are helpful! You may find it helpful to look through our job portfolio to see examples of a lot of different site/foundation configurations.
Hello, what a great post!!!
I have had a Shed for 17 years and all I did was level the area, and put down pea gravel. The shed is 12×10 with 4×4 treated posts attached to the bottom of the shed. I am assuming the shed floor is connected to the 4×4. I have had no problem with it. Did I get lucky? I am planning on getting my shed moved closer to the house and wondering if I should build the foundation. What is your opinion?
Thank you
Hi Mark,
“Lucky” might be a strong word, but you definitely faired better than some folks do! A good foundation makes the biggest difference as sheds become older. With your shed being 17 years old now, you may want to put a more durable foundation under it when you move it. Hope the shed moving project goes well!
Hi there,
Great article! Thank you for posting.
I wish I would have stumbled across this sooner but I had not originally planned on doing just a “gravel” base to begin with. I was considering adding a concrete top layer to it.
But, I’ve already constructed what I hope is a sturdy “gravel” base but just wanted some reassurance, if possible. As after reading your article, I think it will do just fine.
I used concrete blocks for the perimeter (laid them down on a bed of “gravel” as well to help with leveling and prevent any shifting) and dug the interior to a 4 inch depth and filled it with the “gravel” you mentioned. I also used rebar along the perimeter and concreted it in.
However, I had not laid any landscape fabric/material beforehand as the area where the base is being built was almost all dirt (and roots) to begin with. All of that was removed while digging.
Will this be sturdy enough and provide the same level of support you mention in your post?
I started this last fall and I let it settle over the winter and it has held up quite well.
I appreciate any feedback you can provide.
Thank you!
Hi Zach,
From your description, it sounds like you should be fine! The landscaping fabric gives an extra level of stability, so we include it as a standard part of all shed foundations we install (as of the past several years). However, there are plenty of good pads out there that don’t include it.
Best wishes!
If I wanted to attach a lean-to type shed to my house, could I use this type of foundation? Thanks in advance for this awesome diy video…love it!
Hi Layne, we don’t specialize in house foundations, so it’s hard for us to give a specific recommendation. Do keep in mind that if the lean-to is attached to the house, you want to make sure its foundation won’t move separately from the foundation of the house. This foundation would be fine for a free-standing lean-to shed (assuming it includes a pre-built wooden floor).
Sorry that we can’t give more specific advice on your scenario!
Very useful information. I have a quick question. You say add the rebar once your perimeter is complete or 3 high. I want it to sit flush with the ground, can I just add one 4×6 post and call it good, or do I need to have it at least 3 post high?
Thank you! You answered my question.
Hi Cory, one layer of perimeter lumber is fine if the site is mostly level. You can look through our recent projects portfolio for some examples: https://www.siteprep.com/recent-projects/
I really like your detailed project info on the gravel shed foundation. I could not find 4 in. x 6 in. x 8 ft. #2 Ground pressure treated wood in my area; so, can I used 4×4 or what other size would you recommend? Is it also mandatory to clear the grass instead of just laying the landscape fabric and putting the 3/4″ gravel on it? I’m just setting up an 8×10 shed.
Hi Ray, we usually upgrade to 6×6 lumber rather than downgrading to 4×4. You’ll want to have at least 4″ of gravel, so 4x4s will be cutting it a little tight in that regard. The top few inches of soil and grass are the most prone to settling after the shed is in place, so we’d recommend removing them if at all possible.
Can you join 2 6ft planks on the long sides of the pad frame? Should they be anchored together somehow? If so, how?
(Can’t fit 12ft or 14ft boards in my car)
Great article and video! I have a question regarding the combination of concrete piers and gravel. I assume the perimeter is built and then the holes are dug for the piers. I assume you all have to use sonotubes to get the piers to the final height that the gravel will be, correct? Does rebar get staked into the ground of the pier holes prior to pouring? What diameter of pier hole?
I’m undecided on doing piers as a 4-6″ gravel foundation may be more than adequate here in Virginia. If I did decide on doing piers, I believe I’d just do one at each corner.
Hey thanks for the awesome article and video. If my gravel pad is on decently flat ground, do I need to be concerned about drainage? Well the ground fabric allow for any water that accumulates to drain into the ground? Thanks for the help!
I have read some landscape fabric is not permeable. Do you recommend it to be permeable to allow for proper drainage?
Hi David,
We recommend using a permeable stabilization fabric.
Hi Caleb,
We recommend using a permeable stabilization fabric. So unless water is already puddling in that location, the ‘3/4″ clean’ stone and permeable fabric will allow water to drain straight through the shed foundation as it would on regular soil.
Hope that helps!
Hi Steve,
We tie the 4×6 lumber ends together using 4″ exterior screws at an angle (“toe-nailed”) in each direction, plus staking each piece of lumber to the ground with rebar stakes.
Hi Donnie,
You’re correct that Sonotubes are the way to go for pouring concrete shed footer piers. We recommend piers that are 12″ or 16″ in diameter for most sheds (larger piers for larger sheds). As far as reinforcement in the pier, it’s not generally necessary; if a specific township requires it, we will install rebar cages before pouring the concrete.
Hope that helps!
Great information– Got a question. My new shed is a post and beam type which is supported by a two 6X6 skids mounted 16 inches in from the out side perimeter of the sides of the shed. My question is, do I have to cover the entire area of the shed with stone beneath the shed? Or can I place, say two stone trenches of stone, say 30 inches wide beneath each skid for the foundation? The floor of the shed is 2X6 with 3/4″ plywood. The shed is 14X20.
Hi George,
That’s not exactly how we install our shed foundations, so it’s hard to make a definite recommendation. Do make sure that every part of the shed that’s in direct contact with the ground has a firm, level, and well-drained base to rest on!
If you do try two stone trenches, let us know how they turn out…
Hi, this is easily one of the best resources that I’ve come across and my wife and I have found it very useful, thanks! Given that milled and treated lumber has trebled in price in the past six months, I’m curious about alternatives to wood for the perimeter. Is a row of standard cinderblocks, staked with rebar, a viable alternative to ground contact 4x6s? If so, would it make sense to add concrete mix below and around the cinderblocks to minimize risk of outward movement? For my project, cinderblocks, concrete and extra rebar would cost ~$110, while PT GC lumber option would run ~$600. I’d hate to be penny wise and pound foolish though. Thanks again!
Hi Chris,
It mainly depends on the slope of your site. If you’re dealing with an area that’s less than 8″-10″ off level, you should be fine with blocks. Just make sure to stake them well and not leave any large gaps where the stone can escape.
If it’s a more sloped area, you’ll need to be concerned with reinforcing any built-up walls; with lumber perimeters, we recommend “deadman” bracing. You’ll need to find a comparable alternative if you’re using block.
Hope that helps!
I am using your “How to Build a Gravel Foundation” for a 10′ x 12′ Shed. A few quick questions:
1) Can only find 2.5′ x 100′ stabilization fabric in my area. Do I need to tape the the stripes together before adding the gravel?
2) What is the best bit size for drilling holes for the 1/2″ rebar, 1/2″ or 5/8″?
3) My lowest corner is 10 inches from level. Using two courses of 4″ x 6″s, I will not meet the 2″-4″ dig out requirement . Do I need a third course? If so, what size course would be recommended.
Appreciate your help. You have a great site. WELL DONE!
Love the info, I am doing a smaller job, putting concrete stairs off of a concrete patio. What are your thoughts on using this process on a smaller scale for my precast stairs?
Hi Michael,
1. You shouldn’t need to tape the strips together…if possible, you may want to overlap them slightly before adding the gravel.
2. As mentioned in the article, we recommend a 1/2″ auger bit, at least 18″ long. That will keep the stakes nice and tight when you pound them in.
3. If you need to add a third course, it may only need to extend partway around the pad. You can see examples here and here, as well as in our portfolio of completed foundation projects.
Hi Matt,
It’s a bit hard to say without seeing the exact scenario. Generally, it’s a good idea to have concrete footers of some kind beneath a flight of stairs.
This is the best content on the entire internet about this topic. Thank you so much! The post and comments followup answered all my questions. So great!
Damon,
Glad to hear that! Thanks for the feedback!
Hi, I don’t think I’ve ever posted a comment for anything on the internet, but I felt compelled to write and thank you for the very detailed instruction to build a shed foundation. I followed it step by step and couldn’t be happier with the outcome. I’m very grateful for the help, thank you!
Tim, that’s great to hear! Glad it turned out well!
Hi, do you need to build more than one level of the perimeter or can you just have one level?
Hi Jason,
It depends on how sloped your site is. If the ground is fairly level, you may only need one course of lumber. You can see examples of a lot of different foundations in our site preparation project portfolio.
This information is great and made me completely rethink my shed build! I have not found anything else with such a great attention to detail!
I have one question. I’m in Texas and it seems that all I can find locally is 1″ or 1/2″ Crushed Limestone. Would either of these work as a suitable base?
Thanks again,
Hi, Site Prep folks!
Thanks for the detailed, comprehensive instructions on building a gravel foundation. This undoubtedly saved me a lot of future headaches!
I have a specific materials question for you: For the crushed stone, is the 3/4″ size critical, or would 1-1/2″ (clean) work equally or nearly as well? For some reason, I’m having a very hard time finding 3/4″ clean here in western Oregon, but 1-1/2″ is easy to come by.
Hi Chris,
Glad you found the information helpful! If those are your two choices for crushed stone, we’d recommend going up in size; get the 1″ stone. Best wishes!
Hi Joshua,
If you can’t find 3/4″ crushed stone in your area, go with the next largest size that you are able to find. Good luck with your project!
Hi , I am looking forward to building a foundation for a small 20 ft container home and wondering if your gravel foundation will be better than concrete one. Thank you for the great content it helps me to figure out the slope and drainage!
This was so helpful and I’ve watched the video so many times and shared with others.
I have a few questions I’ve been struggling with.
1. My carpenter suggested we use 2 inch of Road Bond place the 4×6 on the Road Bond compacted. Then place the 6 inch of the 3/4 stone ( the local guy has 3/4′ lime stone) is that what I want? and give me your thoughts of the Road bond compacted or should i just go with the 3/4′ lime stone 2 inches then 4×6 and then 6′ of lime stone?
2. I went to our Menards and they had 3 options and I don’t know which one to choose for fabric ( Geotexile fabric)
DuraWeb – nonwoven and Duraweave woven and lastly Ultra poly web. ([Link deleted]([Link deleted]
I’m assuming I should go with the Duraweb non woven as it says water permeable.
3. The carpenter to suggest we put 4×6 (3 of them on top of the stone so the joist can sit on them rather then straight gravel? Any input?
Thank you so much your making this so much easier and so much less stressful.
Hi Inka,
You will obviously want to check any applicable local codes related to foundation requirements for your planned container home. From our perspective, though, a compacted gravel pad should work quite well, assuming the container has a built-in floor. Good luck with your project!
Hi Chris,
Glad you found this helpful! To answer your questions:
1. Adding Road Bond (or crusher run stone) under the perimeter isn’t really necessary. However, it won’t hurt anything if you choose to do it, though you may want to dig down a bit further so it doesn’t lift your perimeter up too high.
2. The DuraWeb is probably your best option there.
3. Not 100% sure what type of shed you’re getting, but it sounds like it’s being built on-site. Most of the shed foundations we build are for prefab sheds, which typically include 4×4 or 4×6 pressure-treated runners below the floor joists as a standard part of their construction. If that’s what your carpenter is referring to, we’d definitely recommend that. Do make sure the runners are fastened to the joists, though.
Hope that helps! If it does and you have a minute to spare, feel free to leave us a Google review here.
I left the google review thank you so much.
Can you comment on the 3/4 limestone ? Is that Ok to use ? When I recommended the wash stone the gentlemen wasn’t too sure.
Can you explain why the Duraweb is the best option here compared to the other? Also Menards had one called Ultra Polyweb. Just Yard words version of Duraweb I think. Any opinions?
We are moving our current shed that is all rotted on the bottom and moving it to the pad. We are going to rebuild the base and joist and then move it to the pad. We are going to bury the 4×6 runners into the 3/4 stone and leave just a inch or too exposed so the joist can rest on that 4×6 runner instead of the stone. I hope that is the right way or a good way of doing it. Thank you so much seriously wish you guys were close so i could use you to do our base. Have a great day and look forward to all the feedback. Wish I could leave 10 google reviews.
Hi Chris,
Sorry we missed the question on stone type. 3/4″ washed limestone is what we use. The reason we used washed stone is for better drainage; Road Bond/crusher run/#57 stone that still has the dust with it tends to pack extremely tight and can slow water from draining away from your building, which is one of the main reasons to choose a stone pad in the first place.
Duraweb and Duraweave are both commercial-grade stabilization fabrics. We recommended the DuraWeb since it’s near the Duraweave in terms of strength, with greater permeability (from what we can tell without seeing it in person). The Ultra Polyweb is a much thinner fabric and we don’t think it’s durable enough for this use.
Hopefully that answers the additional questions!
We have subterranean termites in our area — any wood that touches the dirt is eventually eaten away. Will Ground Contact lumber prevent that or do I need to go with composite decking-type material or metal?
Hi Nolene,
Pressure-treated wood is infused with chemical preservatives to help protect the material against rotting and insects. In general, termites won’t touch ground contact pressure-treated wood. So while ground contact pressure-treated wood is not technically “termite-proof”, it is considered “termite-resistant”. We have not seen termite issues in shed foundations using ground contact pressure-treated wood. Hope that’s helpful!
Great post, thanks for the detailed instructions. I took notes of some details which I can use in the future.
Keep it up
Zac
Thanks Zac!
This is great information, I have been looking for a professional in my area to do this but haven’t had much luck, I may just do it myself as the only quote I was able to get was around $2200 for a 10X14 pad.
My yard is relatively level, the range of differences I got was 1.25-5.25” using the string level. If my door was on the high side I would need 2 rounds and build up in order to get the minimum 4″ of gravel because of the high side. However, my door will be on the low side so I assume I will have to dig out but it sounds as if I will have to excavate and won’t be able to leave the ground undisturbed to get the minimum 4” of gravel with just one round. Without renting a skid steer, would I have to till and then compact the ground before adding the gravel to avoid too much settling?
Hi David,
If your door is on the low side, you will need to dig out as you expected. We always use a mini skid steer; picks and shovels would be an alternative. You could try using a tiller, but we would recommend not setting it too deep; it’s better to make a couple of passes than to go too deep and have a bunch of loose soil to deal with. To save you a little work, you could spread extra soil from digging out the high side of the foundation and spread it around the outside of the foundation on the low side to build a dirt “ramp” up to your door; it might save you 1″-2″ of excavation to get your 4″ of gravel added.
Hope that makes sense…good luck with your project!
If my site is close to level (3-4″ vary), can I get away with one layer for my perimeter? If yes, should the 4x6s be one continuous board? I’m building a foundation that will be 12’x18′. The 20′ boards are spendy and I was wondering if I could get away with 2 – 10′. If yes, should I join them in any particular way?
Hi Bill,
You should be able to do one layer on a mostly-level grade like that. You can use separate pieces of lumber; toe-screw them together at the joints and stake both pieces down with rebar to keep them from shifting. Good luck!
Great article. I am building a 4 x 10 free-standing lean-to shed that will butt up against a garage wall (not attached).
Do I need a base timber along the garage wall or can I just use three sides? Or, if I put one against the garage wall, can I set one edge of the shed one the timber that is next to the garage?
Hi Greg,
You should be fine with a lumber perimeter on three sides. We sometimes install gravel pads butted up against existing concrete…you can see examples of projects like that here, here, and here.
Some of your sites pictures show the timber above the gravel on all sides. How do you level the gravel then if you are not able to screed to leveled timber edges
Hi Jim,
We use a laser level on all of our jobs. In general, we shoot to end up with the compacted crushed stone level with the top of the perimeter; there may be a few exceptions to that rule…not sure which photos you saw.
Thanks for this great resource. Any reason you use screws rather than 60d spikes to connect the courses of timbers? Thoughts on half-laps rather than butt joints? Thanks!
Hi Mike, we believe exterior screws will hold better over time than spikes or nails. Plus, we can easily install screws with an impact driver; if we used nails, we’d have to carry an extra air compressor, nail gun, hoses, etc.
There’s nothing wrong with half-lap joinery, but it’s unnecessary for this type of rough exterior construction. It’s also more time-consuming. However, it certainly won’t hurt if you prefer to use half-lap joints.
Hope that answers your questions!
On the low end, can I build up the perimeter and lay the 4x6s on top of the dirt? Will the dirt erode or cause me issues? Or do I have to have a lip by digging down an sinking the 4x6s into the earth?
I have been using your excellent guide for installing a gravel pad for my Derksen shed and preparations went smoothly until the final step.
I was in the process of leveling the crushed granite when work was suspended due to pouring rain.
When I left the project my feet sank into the surface a few inches and I could use the landscape rake and a 12’ 2×6 to push and pull the surface as level as the larger rocks allowed. I still need to put a couple of inches down over the front half of the pad but after the rain drained away the surface seems as hard as the rock it came from! I am not a small person but I can jump up and down without feeling any give.
My questions are variations of: Do I need to break up the surface before
1) adding the remaining crushed granite?
2) running the plate compactor to flatten the surface?
Hi Carl,
One issue with laying the 4×6 on top of the soil is that you’ll have a 6″ step-up to your shed (plus whatever the height of the shed floor is itself). It usually leaves a nicer finish and gives easier access to the shed if the first course is laid at least 4″ into the ground. Hope that helps!
Hi Ænone,
That’s an interesting issue; I’d guess the stone you used was not ‘3/4″ clean’…it sounds like there may have still been some stone dust mixed in, which hardened with the rain. It should be fine to add the rest of the stone on top as long as you finish by compacting everything well with the plate compactor. Hope that answers your question!
How do you guys bore through 15” of stacked timber? I am having a tough time. Any tips? I am using a Diablo 17 1/2” auger bit as well as well as an Irwin Speedbor auger. Are these the right augers? Any help would be greatly appreciated!!
I am having an issue with the anchoring part.. My building inspector said, “Shed must be permanently attached to the ground and be able to withstand 90 MPH winds load.” When I asked him how I would be able to figure that out, and what the local regulations/ requirements were, he said, “Good question, and I don’t have an exact answer for you. But, in doing some research I was able to convert that 90 mph of force is about 6000 lbs on the long side of the shed. I’m sure that is pretty high and the odds of a 90 mph wind reaching the shed (here in La Crosse, WI) are low, but to be safe, I would suggest any of the screw-in-type anchors that claim to resist 1200-1500 pounds of force will work in each corner of the shed. Just have some specs available (as proof) during the inspection.” I couldnt find any specs on the 2′ rebar anchors you talked about. So, then I looked at the TIEDOWN Storage Shed Eye Anchor Kit that you listed, but they are unavailable in my area and for delivery. Do you have specs for how much force the 2′ rebar can withstand? And how would you attach the shed to the rebar? Or do you have any other suggestions that come with specs proving the 1200-1500 #s or more of force, that are around the same price? Thank you so much for this detailed article and taking the time to do this and answer people’s questions. Your time and effort is priceless.
This is a great write-up on building a gravel foundation. I followed the steps almost to a ‘T’ but every situation is different (shed size, site size, soil condition, location, etc.) so don’t think you have to be so rigid with these steps. Just my 2 cents.
I see a lot of questions here that were all answered by the company which is quite amazing to see. Thanks for that!
A few things to note and hopefully help people feel more at ease when they do theirs.
Until I got the boards I had some concerns about doing this myself. Once I got the boards home, i was motivated to get started.
-My surface was well packed soil so I just knocked the grass down to nothing. I did this with my ride-on set to the lowest position.
-I purchased the wood in 12′ lengths. My shed will be 10×12 so I had to extend two of the boards out to 14′. I tried a lap joint but these boards are heavy and hard to maneuver and it just didn’t come out even. I used butt joints instead and used one of these Simpson Strong Tie plates on each side of the board to join them together (to line up the 12′ and 2′ boards end to end, i used wood clamps and 1×3 boards on each side to make a ‘sleeve’ to keep them aligned while i was joining them together.
Lowes has “Simpson Strong-Tie 5-in 20-Gauge Galvanized Steel Tie Plate Wood To Wood”.
They worked well.
-String and stakes helped to approximate the area where the foundation was going. My shed builder needs 3′ on each side to do the install work so I used my fence as a reference point. For me the string got in the way while i was laying my boards. So i just pushed it out of the way.
-I know the steps here say to start on the low end, laying your first board. My ground is level within 4″ so it was easier to start on the high end and sink the first board about 2″ into the soil. Just make sure you have enough room for 4″ of tamped gravel.
-I used the boards as a guide by cutting into the soil with my shovel up against the board. Then I moved the board aside, dug out soil, and place it back in until it was level.
-Once that first board was in I placed the next board and got an idea of how much I would have to dig out to make them both at the same height.
-I used a framing square to get the corners square. Per the steps here I toe-nailed the corner using 2″ screws (added screws on the sides later)
-I just repeated the process for each corner.
-So my last board that went on the ‘low’ ground was about 1/2″ off the ground once I connect it to the adjacent board. I used a 1×4 as a shim underneath to support it. Next I back filled the gap with top soil. I came back later (when the gravel was in, etc., and added top soil to the outside and seeded the soil.)
-i stapled string from corner to corner, side to side, all at equal height from the top of the board until the highest end touched the ground. Wherever the string wasn’t touching the ground, I added top soil, tamped it, and repeated until all string was touching soil.
-Next I ordered the stabilization fabric from Home Depot. It came in 3.5×100 size so I just overlapped the seams, starting at the high end of the ground so that each seam was facing away from the high end and toward the low end.
-Once in place I shoveled gravel in different areas to keep the wind from moving it around until I could staple in to the boards.
-GRAVEL – you get what you get. I ordered 57 wash stone from the local landscaping supply and it was dry as stale bread. It was mostly 1″ in size but it isn’t like they can measure each piece and send you only 3/4″ stone. For my 12×14 area, I needed just under 3 yards but got the full 3 yards just in case.
-I stacked some 1x4s next to the board on the low end so that the weight of my wheelbarrow wouldn’t press the board into the soil as i was running over it. I would make quick runs over these boards and over the 4×6 to minimize movement.
-REBAR – i went with 1 course of 4x6s because again my ground is mostly level. I still used 24″ rebar just because it can’t hurt. I did call 811 but the thing with them is, they won’t tell you if you have private lines or even your house water supply line next to where you are working. The guy that came did me a favor and checked using one of those divining rods. He said i was good but that he couldn’t mark it out.
-I banged rebar into each corner, approx. 2′ in from the ends.
-I later added additional rebar in the middle, between the corner rebar, of each board.
-Standing on the boards or having someone stand on the boards while you hammer the rebar in makes it a lot easier. This keep vibration down and makes your hits more solid and help keep your frame from moving out of place, etc.
-Do the rebar before you tamp the gravel. If you haven’t used one, Tampers are heavy and hard to turn, you will hit your boards and you want them stabile before you start tamping.
-RAIN – i saw another comment on this. When the gravel was dry it really wasn’t “locking” together. This causes you to spend a lot of time trying to go in circles, working from the inside out. What happens is, the tamper want’s to move straight. When you pivot it to make it turn, it digs into your gravel. I don’t know the best way so i just avoided tight turns. So for me it was hard to follow the “work from the inside out” step. So now it starts raining and now my gravel drops an inch as I am tamping it. So like someone else said, it seemed to lock together better when wet. And no, this was not cut/run 57, this was relatively clean but it was DRY when it was delivered and HOT here. If i had to do this all over again I would mist the dry gravel with water BEFORE beginning the tamping.
-So once it was mostly level I dropped a 4′ plastic level in a few areas and it looked good. My shed builder will shim the floor joists to correct anything under 6″ from level. If they complain about 1/16″ i’ll kick them out.
-After a few days I made sure it didn’t settle in any one area.
-Finally I laid heavy duty landscaping fabric (not the fabric from the earlier step) over the area of the gravel where the shed’s 4×4 floor joists will sit. That will keep the wood off of the wet gravel when it rains.
If you can follow that Website link you’ll see my project. The pictures are out of order but you should get the idea.
Hi Carl,
Sorry for the late reply! If your drill is getting bogged down, make sure your battery is full (if using a cordless drill), that you’re using a drill that’s large enough for the job, and that your drill is on the right setting (some drills have a hammer setting that won’t let you apply full torque). You’ll also want to make sure you have a nice, sharp bit. Also, make sure to work the bit up and down every inch or so as you drill; that will help the wood chips to work their way out and not clog up the drilling area. Hope that’s a help!
Hi Kayla,
We use the rebar to anchor the foundation perimeter in place, but not to anchor the shed down. We usually suggest that folks check with the shed builder, as they often have an anchoring recommendation and, in some cases, may even be able to install the anchoring for a fee. If that’s not an option, there are some online stores providing anchoring solutions, such as American Earth Anchors. We have not used them ourselves, but they seem to have a good variety of anchoring solutions, plus the ability to filter products by “holding power”. Hope that’s helpful…let us know what solution you land on!
Bob,
Thanks for sharing your experience and the photos of your project! Looks nice!
Hi there,
Thank you for putting all this together so thoroughly. I’m actually looking into placing a Hottub on this foundation but I’m a bit worried that it withstands the weight (fully loaded probably 4500 lb). The slope is around 14 inch and the location where I would place the tub would require to make the frame a trapezoid and not rectangular. Do you have any experience here?
Thank you for the info
Nice article! Been referring to this a lot as I build my gravel foundation. I have a quick question, on a foundation that has a slight slope, do you back fill with dirt until level with 6 inches left for the crushed gravel? My back side was off about 4 inches.
This is a great write up. I used it to build a foundation for a 7×7 resid shed with a flat bottom. The results exceeded my expectations. Thank you!
I am now going to build a second foundation for a 12×12 shed with 2×4 floor joists that run the length of the shed underneath the floor board. The joists effectively lift the shed off the ground it is placed on.
My question is whether tjoists are compatible with the crushed stone foundation. If so is the idea for the joists to be buried into the layer of stone or to float on top?
Hi Patrick,
We have definitely installed this type of foundation for hot tubs in the past. Obviously, rectangular pads are what we commonly work with, but you should be able to adjust it to a trapezoidal layout. With a 14″ slope, the key will be installing deadman bracing to support the built-up end of the foundation. Hope the project goes well for you!
Hi Cory,
We typically backfill with gravel. Backfilling with loose dirt opens the possibility of the foundation settling beneath your building in the future. If you do use any dirt to backfill, it’s important that it’s packed very well. Hope that makes sense!
Hi Tito,
Most of our foundations are built for sheds that have 4×4 or 4×6 “runners” or “skids” beneath the length of the building, similar to what you’re describing. The idea is for the skids to rest on top of the compacted gravel. This photo shows what that looks like.
If I’m building my shed on site, is it necessary to build the foundation 2 feet wider and longer? Or can I build it to the exact size? 12×24 shed and 12×24 base.
Hi Bob,
It’s your call to make, but we recommend keeping the foundation a bit larger than the shed. Here’s an article that explains the benefits of having your shed foundation 12″ wider than your shed dimensions. Hope it’s helpful!
Unfortunately I’m a little outside of your service area or I would have loved to hire you to build my foundation. I have built up my foundation and it is 42″ off level. I’m a little concerned at the amount of gravel fill that it will need to hold (I calculate 20 cubic yards or so.) I have followed all the instructions pretty closely and have 4 rebar reinforcements along the deep side. Here is a picture.
[Link deleted]
Will this be able to hold ~30 tons of gravel + the weight of the shed and anything I put in it? Is there anything I should do to reinforce the back wall where the largest amount of fill will be resting?
Thanks in advance and thanks very much for this very detailed guide!
Hi Tim,
Sorry for the delayed response. For some reason, the photo link was deleted when you posted your comment, so it’s hard to give a definite answer without seeing it. However, we would always recommend adding “deadman” bracing on a site that’s 42″ off level. If it’s still helpful, you could try sending the photo to our office via email: info@siteprep.com. Best wishes!
Hi, absolutely great guide! I’m in Northern Ireland, I plan on building a very large shed on my garden allotment plot. 15 foot by 19 foot. The plot is relatively flat, I was wondering if it is possible to build the perimeter for the gravel bed using breeze blocks, then to lay pavers over the gravel bed, and then use breeze blocks as footings on top of the pavers for the shed floor to rest on?
This is my first project of this size, and I want it to be as safe and secure as possible for obvious reasons.
Any help or advice would be hugely appreciated!
I’m going to be building a pad on a slope that looks a lot like your project for Tonya K in Pottstown, PA from 4/19/21. Door will be on the high side. The pictures look like you have 4 courses of 4×6’s, and I think that’s what my low side will need. Question is: do you have 4 courses of wood all the way around, so that the high side has 3 courses completely underground? Or are the bottom courses just 3 sides? Are there any specific guidelines for either choice – like how far the 3-sided sections need to go into the hill? Also, do you backfill the low side with stone and not disturb the dirt, or do you fill in with compacted dirt until you’re at 4 inches of gravel all around? Thank you very much for your informative site.
Hi Jay,
This is a bit different than how we usually do shed pads, so it’s hard for us to give a definite recommendation. The breeze blocks might work if laid on their sides since your site is nearly level. We’d be careful using breeze blocks as the main structural support for the shed, though. They’re not generally designed for structural load bearing. Good luck with your project!
Hi Chris,
We generally continue the course of lumber until it’s completely underground, but not necessarily the whole way around the perimeter. So in the example you mentioned, the top 1-2 courses would continue around the entire perimeter, while the bottom 2-3 courses would only be on the low sides.
As far as leveling, we’ll sometimes use a little of the dirt from the high side to backfill on the low end, be we don’t use much and we always make sure it’s compacted really well. We do most of the backfilling with gravel.
Hope that answers your questions!
This post is an absolute beast and I wish you were closer so I could hire you! I have a situation where the front 2-3 feet of the shed will rest on an existing concrete pad and I was planning to follow this guide for the back 8-10 feet of the shed pad. Any red flags there?
Hi Guy,
We’ve actually installed pads in similar situations, so you should be good to go. A couple of things to keep an eye on:
1. Make sure the concrete is nearly level. Since your gravel pad will be level, you don’t want one edge of the concrete to end up higher and put extra strain on a specific part of the shed.
2. Make sure there’s no water puddling on that part of the concrete. If so, you’ll want to cut a drain line or do something else to get rid of the water.
Best wishes with the project!
It’s level and lo and behold, we just had a rain so I was able to see there were no birdbaths on that part of the concrete. Regarding the timbers: should they butt up against the existing concrete pad and be exactly level with it? Thank you!
Guy,
You want the edge of your lumber perimeter to butt up to the existing concrete and be level. The top of your crushed stone should be level with the top of your perimeter and the concrete as well. You can see a picture of a concrete pad incorporated into a gravel foundation here. There may also be some other examples in our portfolio of past projects. Good luck!
Thanks for the great info!
I Need to make a base for a 14ftx8ft timber shed to go in a walled garden corner. Back of shed will be 12″ away from a high retaining wall and one end 12″ away from a block boundary wall. Can I use the existing walls to retain the gravel on two sides of the base and just make a timber retaining frame for the two exposed sides? Relatively flat area so not to much digging, probably go down a few inches beyond soft topsoil, lay the timber and fill gravel to top of 6×3 (can’t get 6×4 here). One layer of timber should do it. I’d still rebar the front and side timber frame into the ground but would fixing to the walls be an issue?
Hi Dan,
Your plan sounds fine. We’d still recommend at least 4″ of gravel, but butting up to the wall should be fine. Here’s an example of a similar situation against blacktop: https://www.siteprep.com/recent-projects/delaware,gravel/daniel-debra-v-gravel-shed-foundation-in-greenwood-de/
Thanks for your reply and advice regarding my questions above. I’ve dug out a good 6” deep 21×11’ area, removed all topsoil down to clay & rock. Used 8×4” pressure treated sleepers as my retaining sides, fixed to the walls at the ends with masonry L brackets. My sleepers are one layer deep (laying on 4” side) lowest point 2” above lawn level. Sleepers are joined using galvanised flat plates. Haven’t put rebar into the ground, it’s very rocky below & frame feels very solid as is.
I’m filling with 5 tonne of 3/4 clean crushed stone tomorrow, may try to add rebar into ground if I feel it needs it as I go.
The hardware shop tried to convince me I needed crusher run stone & dust. I was second guessing myself.
The shed builder wants to put shed on concrete blocks, one block high to add a bit more height from ground contact. Can blocks be used on top of clean crushed stone whacked down? Or is crusher run better if putting shed on blocks?
Hi Dan,
We always use 3/4″ clean (and we’ve installed 1000s of these pads). Crusher run packs tighter, causing it to not drain as well.
We don’t recommend putting the building up on blocks; we have a whole article here about why. In short, blocks don’t support it as evenly across all parts of the shed structure, plus they make it harder to get stuff in and out of the shed. And with the 3/4″ stone underneath, it will drain really well, meaning ground contact isn’t really the same as on bare soil. You can put blocks on top of compacted 3/4″ stone, but it’s not something we recommend.
I don’t know what part of the country you’re in, but here in the northeast most of the shed builders have switched to actually recommending that their customers get a stone pad. Pads are just that much better than blocks. Of course, if it’s a warranty issue, go with whatever your builder requires.
Hope that helps!
Thanks for the awesome guide. I have a 5X6 shed and am planning to build a 7X8 foundation on level soil with one level of timber. If I bury the timber about 4″ below grade with 4X6 posts do I really need to use rebar? Also, I’m calculating that I need roughly 2 cubic ft of gravel, is this correct?
Hi John,
We install rebar on every job we do. You may not need it for a single course…it’s your foundation so you can decide what risks you are comfortable with. 🙂
You should need about 1 cubic yard of gravel. Good luck!
Hello, thanks for the helpful info. What do you think about using Pavestone retaining wall blocks (3 in. x 10 in. x 6 in.) instead of 4×6’s for the gravel perimeter? I’d say about half of the perimeter would use one row of blocks, with possible 3 rows around one of the corners. I’m mainly concerned about the longevity of the PT 4×6’s. Thanks!
Hi Brandt,
It certainly seems like it could work. It’s not a method we use, so it’s hard for us to comment specifically on the pros and cons of Pavestone. Since it sounds like your site is mildly sloped be sure to consider whether you’ll need any bracing on the built-up end. Good luck!
I’m using the build up method because of slope. I’m estimating 3 layers of 4×4. 1. My question is does each layer of 4×4 need to go all the way around the entire perimeter which would essentially bury most of the 4×4’s on the side of the pad that’s not being built up?
2. If that’s not the case can you explain in further detail how I’m supposed to do it?
Hi Randy,
The perimeter does not need to continue the whole way around the shed foundation. Each course of lumber should go far enough for the end to be underground, then you can continue with the next course. Hope that makes sense!
I’m building an advanced form of apiary structure that amounts to a 6’x8′ shed with one of the long walls being heavy (think like that wall ends up being 1,500-2,500 pounds spread across 6 feet of width, and the amount of weight fluctuates…a lot). Is a crushed stone pad an appropriate foundation, and should I consider making the pad deeper than 6 inches for that kind of extra weight concentrated over such a small contact area?
Outstanding instructions. With all the Q&A it’s all there! Thank you much.
I just finished my ~ 8’x8’ for a hot tub; already filled it with the stone. To explain the slope, one side is one course above ground and its opposite side is four. For looks I want to skirt three sides with vertical composite decking. Do you see any problem, with that? I think drainage will still find its way out.
Hi John,
Yes, a gravel foundation should be sufficient, although making it a bit deeper as you suggested is a good idea. If you’re really concerned about the support, you could also consider combining the gravel foundation with concrete pier footings.
Hope that helps!
Hi Gregg,
That’s a great idea aesthetically! It should not cause any drainage issues, as these foundations are designed for water to flow straight through and into the ground below. It sounds like it’s too late for your project, but we recently published an article specifically about gravel bases for hot tubs.
Good luck with the final touches on your project!
I just finished my shed pad. It is 4” on the high side and over 24” deep on the low. I called for stone delivery and they recommended #2 crushed gravel. Is this going to work for me? What if I use earth and boulder fill to keep the rocks in?
I have a very unique situation. The previous homeowner had dug a cellar under the shed for storage of supplies. We essentially ignored it, opening it up every year or 2 to make sure all was good. Well, all was not good last time. The pump was no longer plugged in and there was 3 feet of water. This has caused the floor of our shed to rot. We would like to fill this hole in before fixing or installing a new shed. Can we just fill with stone? The walls of the cellar are cement blocks. I can’t find an answer, because it seems this hasn’t happened before, lol!
Hi Chris,
#2 crushed stone is a bit larger than the 3/4″ clean stone we typically recommend. It should still work assuming you’re able to compact it to lock it in place.
Hope that helps!
Hi Angie,
That certainly sounds like a unique situation! It’s hard for us to give any guaranteed advice, having not seen the site in person. However, it sounds like you should be able to fill the hole with rock and compact it. You may be able to use some type of larger fill (old concrete, larger rocks, etc) and then fill the spaces with a smaller crushed aggregate.
If you plan to build on the site, consider hiring a local site preparation contractor to at least inspect the site and assess the stability of the area. They will be able to better assess any potential risks after an in-person visit.
Good luck!
What type of geotextile is best under the crushed stone -ie woven vs cotton type ?
Hi Peter,
We use a woven synthetic material.
Hi, Can you clarify something? In you video it says make sure to have 12″ of gravel perimeter and then the lumber frame but in here an illustration shows the 12″ includes the 4″ of timber frame. I am building a 10′ x 20′ shed. To keep it simple I am using all 12′ 4×6 timbers. I originally planned it to be 12′ wide by 24’8″ long – but that would be 8″ of gravel/4″ timber on 3 sides and 3’4″ gravel/4″ timber at the front. Would this be acceptable? We are going 6″ down. Or do I need the full 12″ of gravel all the way around, which would give me a 12’8″ wide by 24′ long pad. Thanks for the information and help!
And one other question. If you are only having one level of wood on a level site, do you still use 2 feet long rebar? Would a shorter length be better for anchoring the one piece of lumber into the ground? Thank you!!
Hey guys – any thoughts on putting the woven weed barrier on TOP of the stone as well? I was considering it in order to keep the stone in place.
Do you use the same geotextile fabric under play set mulch as you do under shed foundation gravel? It appears that way in your play set article/video. Are there any concerns with the heavy duty fabric not draining as quick under the mulch? Or should it mostly still drain well enough while also being a better weed control than cheaper fabric?
Really appreciate the level of detail you provide not only for educating customers on the process but for the DIY folks as well!
Hi Jill! Sorry about the confusion. Yes, it’s probably best to have a 12″ gravel perimeter the entire way around your shed. Here’s an article detailing why: https://www.siteprep.com/gravel-shed-foundation-12-wider-shed/
Yes, Dave, it’s not a bad idea! Go for it!
Yes, we would still recommend using 2′ rebar for anchoring the lumber into the ground.
Yes it’s the same type of fabric as the stone foundations, it’s designed to be a good drainage fabric as well and will drain much better than any type of mulch will.
Hi Guys – Thank you for the great information you have provided. I plan on creating a 10×10 gravel foundation for an 8×8 shed. The shed is going to go into a back corner of my house. In some of your job pictures, it looks like you put the 4×6 next to the existing structure (house) and in others there doesn’t appear to be 4×6 next to the structure . Do you have a recommendation when constructing next to poured concrete walls? In this case, would I only have (2) 4×6 and use the corner walls of the house, or should I install (4) 4×6 and run two next to the concrete? Thanks!
It really depends on the type of wall you have, but typically we put up our foundation right against the wall or house with no problems. You would not need a 4 x 6 on the side of the wall.
Pingback: Above-Ground Pool Bases: The Complete Guide | Site Prep
Great information! Our local rock yard has a 3/4″ crushed stone that is is supposed to be cleaned of smaller stones and sand but looks dirty and is a brown/tan in color. What I see in quite a few gravel shed pad pics the gravel is a gray color and looks nicer. Should I be searching for something washed and clean looking or is the dirty brown/tan looking stuff going to work OK?
The “dirty” 3/4″ crushed stone will do the job, but “clean” or “washed” stone is more ideal and will drain better.
HI,
Im looking to put gravel base in corner of garden for cabin. the corner has a timber retaining wall 2 sides (right angle).
is it ok to use that and just add the timber foundation to the other 2 sides.
thanks
Thank you for your very informative site! If my shed is going to be in the corner of my lot with fence on two sides of it, could I get by just using 4x6s on the 2 sides not against the fence. The ground is fairly level and I should be able to use one course of timber to get completely level. Would the rebar be enough to keep the 4x6s in place? Thanks in advance!
I’m building a 12×10 shed on a gravel pad. My question is, can I frame the floor directly on the gravel with treated lumber, or do I need to use PT skids underneath the framing? Thanks
Yes, we would say it’s good to have timber around the entire foundation, but it’s up to you.
Yes, the rebar should hold it in place.
Here’s an article that may answer that question better: https://www.siteprep.com/shed-foundation-options/
Pingback: Leveling Ground for Playsets: The How-to Guide | Site Prep
Glad to hear that!
What is the suggestion to prevent the area between the shed floor and the foundation, so as to prevent critters from taking up residence there? Should I put the shed floor directly on the gravel foundation, but then the floor material would need to be rated for ground contact? Or, should I use skids and then somehow block the area between the shed and the foundation? Perhaps something like chicken wire and gravel, 2×6″s, or something else. What have you seen, and what do you suggest? Thanks
Using a critter guard (like attaching 2×4 blocks in between the skids) would help.
If the length of the foundation is 18’, can I use 2 9’ lumber and secure them together, or should I stick with one board? Thinking of transportation of 18’ boards isn’t the best option
If the perimeter is 18’ long, can I use 2 9’ boards and secure them together?
If the perimeter is super long, can I use several boards and secure them together?
Yes, that could probably work.
Yes, that could probably work.
Pingback: How To Secure Your Shed Into Gravel - Site Prep
I am having a hard time figuring out how much stone to get. The foundation will be 10×22 feet, 4 inches deep.
I want to build a 10×12 shed in the corner of my back yard. Is it okay if the gravel pad is in the corner touching each (2) wall? The shed will be 3′ from the 2 corner walls and 1′ of gravel on the other 2 sides.
Also, I can’t find 4×6 ground contact treated wood locally. Is it okay to use 4×4 wood even if the actual size is 3.5″ or do you think it’s better to dig and stack 2, 4×4 pieces? My yard is pretty level and i’m in the desert where we hardly get rain.
I also have some decorative rock and rocks that were pulled out when leveling the yard. Is it okay to mix it with the new 3/4″ rock that i’ll be buying? How big would be to big to be mixed?
Pingback: 5 Ways to Keep Your Shed Floor From Rotting - Site Prep
This article and the youtube video are outstanding! Thank you for this resource.
Do you think 4″ of crusher run on top of 4″ of the clean 3/4″ stone be a reasonable alternative to maintain some drainage while providing a more compact and stable driving surface? I just feel that the 3/4″ clean stone wouldn’t be sufficiently stable for some of the vehicles I plan on driving into the small garage/large shed I’m building.
Thanks again
Hi Tom, please feel free to reach out to us using the link we provided, so we can discuss your job further. Thank you. https://www.siteprep.com/get-quote/
Hi Chris, we may need some more information in order to better assist you. Please feel free to reach out to us anytime, so we can discuss the work in more detail. Thank you. https://www.siteprep.com/get-quote/
Hi Deborah, we strongly advise that you confirm with your stone supplier before making a purchase, as the quality and appearance of each type of stone can differ greatly. By doing so, you can ensure that the stone you receive meets your specific needs and expectations. Thank you.
2 questions: when building up multiple levels, is it recommended to stagger each row a bit inside of the row below (i.e. 1/8th of an inch)? And second question: for deadman brace, seems best to build those into the wall, but then should a horizontal end piece be added to the deadman brace (which is perpendicular to wall) with a piece of rebar through it?
Hi Michael, in order to assist you better, we will need more detailed information. Please feel free to reach out to us using the provided link. https://www.siteprep.com/get-quote/
Hi Site Prep, I have the same as Paul from above: “I’m building a 12×10 shed on a gravel pad. My question is, can I frame the floor directly on the gravel with treated lumber, or do I need to use PT skids underneath the framing?”
Pingback: Discover the Top 14 DIY Auger Ideas You Need to Try - Bestideadiy
Pingback: 34 Excellent DIY Sink Stand Utility Ideas for Your Home - Bestideadiy
Hi. May I ask some advice on the 3/4″ crushed rock foundation which you recommend.? I’m building an 8 x 12 shed on 4x4x12 skids that will house fairly heavy items & I’m planning to build a boxed in foundation of 3/4″ crushed rock foundation as recommended in your blog/vlog. My questions are, is tamping by hand just as good as machine tamping the crushed rock? If hand tamping do you follow the same pattern as illustrated in the video working inwards towards the centre? I want to be able to possibly move the shed at a future date, thus my skids, and I don’t want my skids to sink into the crushed rock over time. To prevent sinking would it be advisable to add some sand with the 3/4″ crushed rock to create a more packed down and hard surface to prevent sinking of the shed skids into the crushed rock, or would adding sand compromise the proper drainage of the crushed rock foundation similar to how crusher dust would compromise the proper drainage of the foundation? As a note, I’m building in Northern Canada, with all the weather & temperature extremes & precipitation & moisture of all 4 seasons. Thank You in advance for your feedback.
I’m having a shed built right now and it is being built right on grass with concrete blocks at the corners and under the shed through the center and spaced under the floor joists. Is there anything I can do after the fact? It already has the sides and roof on it. Thanks.
After building up, does the dirt need to be level inside of the perimeter, or can the dirt be higher on one side and lower on the other side, as long as there is 4 inches of gravel in all spots?
After building up, does the dirt need to be level inside of the perimeter, or can the dirt be higher on one side and lower on the other side, as long as there is 4 inches of gravel in all spots??
Fantastic article! My only disappointment is that you don’t cover my area in far northern SC.
I’m looking at a built up pad for a 12×20 shed. Drop from the high corner to the low is about 33 inches.
I plan to use deadman bracing, and will be making the frame out of 4×6 timbers and filling with #57 stone.
When filling a pad like this, do you recommend all stone, or should the deeper areas be filled with dirt?
Also, how much setback do you recommend between courses to “slant” the timbers inward? From the pics, I’d guess 1/4” or so.
Really appreciate your website. Better than any book or other resource I’ve found!
Hi, Great info!
Any chance you can supply the name of the manufacturer of woven fabric you use?
Thanks
Hi Kevin, would you mind contacting us at this number or link, so we can assist you better. Thank you. https://www.siteprep.com/contact/ 717-799-7311
Hi William, as long as you have a minimum of 4 inches of stone, the dirt does not have to be level inside the pad.
Hi William, as long as you have a minimum of 4 inches of stone, the dirt does not have to be level inside the pad.
Hi Debbie, there’s not a lot of options after the shed is built, I would do all I can to get stone under the shed before it’s built father. The block can work short term, but you may have some issues with settling down the road, just something to keep in mind.
Thanks for preparing such an awesome site and responding to questions from DIYers like me. I’m preparing to build a shed pad next week, but I’m not sure exactly what 3/4″ crushed limestone to order–clean, washed or clear? This article uses the terms “clean” and “washed.” Are those two different products? My local dealers says they are, or they dismiss the terms altogether. Another dealer uses the term “clear.” I’m confused.
We would recommend 3/4″ clean crushed stone.
We’d recommend renting a machine to tamp for a stronger lock.
Feel free to call us at (717) 799-7311 to discuss further!
Feel free to call us at (717) 799-7311 to discuss further!